Model HQ
DocumentationExploring tools in Model HQ
The Tools section provides powerful utilities for managing local setup, development workflows, and system diagnostics within Model HQ. This centralized interface includes backend server controls, CLI access, development SDKs, model management utilities, and system information displays.
The Tools section in Model HQ gives you helpful features to set up, manage, and check how the system is working.
In one place, you can control the backend server, use the command line (CLI), connect with developer tools (SDKs), download and manage models, and view system information about your computer.
After setup, these tools help both regular users and developers get more done. You can run Model HQ in the background, automate tasks with commands, download sample files to test, install models, and check that your system is ready.
These features also let you connect Model HQ to bigger systems, fix problems, and make sure everything runs fast and smoothly.
Learning how to use the Tools section is important if you want to do more advanced work, like running Model HQ as a behind-the-scenes AI service instead of just using the app.
1. Launching the tools interface
To begin, the Tools button (🔧) located in the top right side of the main menu can be selected.

2. Tools interface overview
After launching the Tools section, the interface displays the following key options:

The tools interface provides access to the following utilities:
| Option | Description |
|---|---|
| Backend | Launches the internal API server in headless mode for programmatic access |
| Demos | Accesses pre-built demonstrations for bots and agents |
| SDK | Downloads the Model HQ Client Tools Kit for IDE-based development |
| CLI | Opens a command-line interface terminal for advanced operations |
| Share | Enables session sharing over an external IP address for collaboration |
| Updates | Checks for and downloads new content, agents, templates, and SDK updates |
| Test Server | Verifies that the Model HQ server is functioning correctly |
| Model Downloader | Manages model downloads and completes standard model set installations |
| Inference Log | Stores and displays inference transaction logs from the database |
| Sample Docs | Downloads pre-curated document packages for testing parsing and RAG workflows |
| System Info | Displays detected system configuration including memory, processor, disk, and GPU details |
Option
Backend
Description
Launches the internal API server in headless mode for programmatic access
Option
Demos
Description
Accesses pre-built demonstrations for bots and agents
Option
SDK
Description
Downloads the Model HQ Client Tools Kit for IDE-based development
Option
CLI
Description
Opens a command-line interface terminal for advanced operations
Option
Share
Description
Enables session sharing over an external IP address for collaboration
Option
Updates
Description
Checks for and downloads new content, agents, templates, and SDK updates
Option
Test Server
Description
Verifies that the Model HQ server is functioning correctly
Option
Model Downloader
Description
Manages model downloads and completes standard model set installations
Option
Inference Log
Description
Stores and displays inference transaction logs from the database
Option
Sample Docs
Description
Downloads pre-curated document packages for testing parsing and RAG workflows
Option
System Info
Description
Displays detected system configuration including memory, processor, disk, and GPU details
Each tool serves a specific purpose in the development, deployment, and diagnostic workflow of Model HQ.
3.1 Backend
The Backend option can be selected from the tools interface to initiate the backend API server in headless mode, which closes the user interface and enables direct API access.
This deployment mode is ideal for lightweight, modular scenarios where Model HQ operates as a backend service. Once launched, the server runs as a background process and can be accessed via localhost or over an external IP address—enabling private, local inference workflows or integration into larger systems.
A download link for the Model HQ SDK will be provided, containing all necessary libraries, sample code, and examples. The SDK package can be unzipped, opened in any preferred IDE, and used to interact with the backend APIs programmatically.
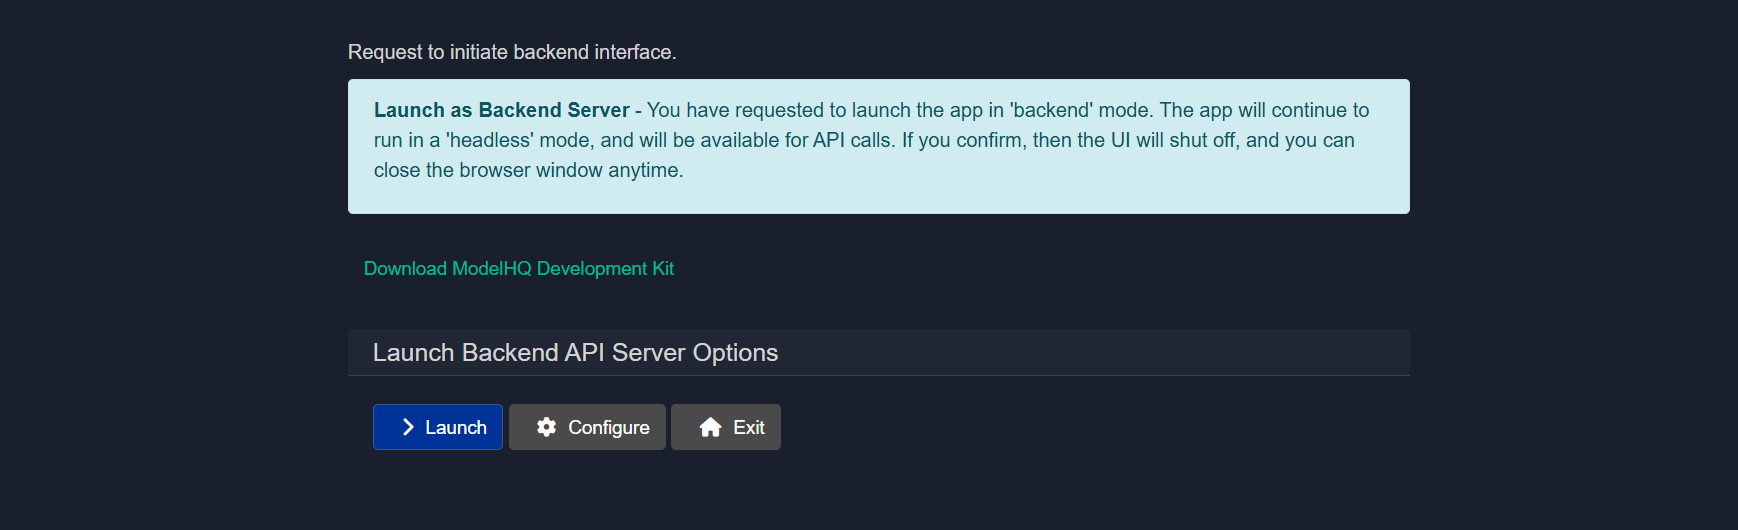
The backend interface includes two main options:
- Launch: The backend server can be started immediately.
- Configure: Configuration settings can be adjusted before starting the server.
Example usage with llmware Python client:
from llmware.web_services import LLMWareClient client = LLMWareClient(api_endpoint="http://0.0.0.0:8088") response = client.inference(prompt="Who was the U.S. President in 1996?", model_name="phi-3-ov") print("llm response:", response)3.1.1 Launching backend server
Once the launch button is clicked, the backend will be initiated. Helpful tips will be displayed as shown in the screenshot.

3.1.2 Configuring backend server
This step configures the Backend API Server for Headless mode operation. The backend server exposes APIs that agents, services, or external systems can invoke without relying on the graphical user interface.

This configuration defines the server's network location, access method, concurrency limits, and optional security controls.
3.1.2.1 Server Mode: Localhost or External IP
Choose how the backend server should be exposed.
Options:
- Localhost The server is bound to the local machine only. It will be accessible as
127.0.0.1and cannot be reached from other devices or machines. - External IP The server is bound to a network accessible IP address, allowing other machines, agents, or services to connect.
When to use:
- Use Localhost for development, testing, or single machine setups.
- Use External IP for shared environments, distributed agents, or production deployments.
3.1.2.2 IP Address
Specifies the IP address on which the backend server will listen.
Behavior:
- If Localhost is selected, this is automatically treated as
127.0.0.1. - If External IP is selected, provide a valid internal or public IP address.
Example:
192.168.29.933.1.2.3 Port
Defines the network port used by the backend server.
Default example:
8088Notes:
- Change this only if the default port is already in use.
- Ensure the port is open and allowed through firewalls if using an External IP.
3.1.2.4 Workers
Controls the number of lightweight worker processes handling concurrent requests.
Example:
4Guidelines:
- Keep this value low by default.
- Increase only if you observe request bottlenecks or specific performance issues.
- Higher values may increase memory and CPU usage.
3.1.2.5 Trusted Key
An optional shared secret used to secure API access.
Behavior:
- Can be left blank if security is handled elsewhere.
- If provided, clients must supply this key in API requests when key enforcement is enabled.
Example:
my-secure-backend-key3.1.2.6 Require Trusted Key
Controls whether the Trusted Key is mandatory for all API calls.
Options:
- Require Key All incoming API requests must include the trusted key.
- No Key API requests are accepted without authentication.
Recommendation:
- Enable Require Key for production or shared environments.
- Use No Key only for local development or isolated networks.
3.1.2.7 Result
Once configured, the backend API server will start in headless mode using the defined network settings, concurrency limits, and security rules. This server becomes the primary execution and integration point for agents, MCP services, and external systems.
3.2 Demos
The Demos section is designed to make demos of bots and agents easy for users. This section contains all demonstrations that have been created by the user as well as some Model HQ pre-packaged demos for bots and agents. Demos are often packaged with pre-loaded prompts or queries and are designed to run automatically with the pre-loaded prompts to illustrate the bot or agent.
Demonstrations can be executed directly from this interface.

This provides quick access to test workflows and example implementations without navigating through the full bot or agent creation process.
![Note]
To create Demos to be added to this section, go to Bots > [select the name of bot] > Edit > Demo. In this section you will see either the option to build an input list of prompts OR a list of prompts (if the demo has already been created for the Bot). For a tutorial of how to create a demo for your custom bot, please watch our YouTube video, "One-Click Live Demos for Your AI Chabots": https://youtu.be/il48-IaEfxw
3.3 SDK
The Model HQ Client Tools Kit (or Model HQ SDK) enables Model HQ to be run within an IDE environment and allows the backend server to be operated as described in the Backend section.

The SDK provides all necessary libraries, documentation, and code examples for programmatic integration with Model HQ's backend services.
3.4 CLI
The CLI option can be selected to open a separate command-line interface window where commands can be executed directly.

By selecting the CLI option, a second instance of the application will be created and exposed through a new terminal window. The CLI can be used to run chat sessions in parallel while the main application UI remains active.
To get started with CLI operations, the help command can be entered in the terminal to display all available commands and actions.
3.5 Share
The Share Connection feature can be used to transfer the session to an external IP address. This is particularly useful for collaboration or accessing the interface from another machine.

When sharing is enabled, the localhost connection will be closed and the Model HQ application will be transferred to an externally accessible IP address available over the network. Any device with corporate network access to that IP address can then be used to access the application, including smartphones, tablets, or other PCs.
Sharing will stop the current session and relaunch it with a new IP configuration.
The IP address and port should be entered into a browser on any network-connected machine to access the shared session.
Firewall port settings may need to be adjusted to enable external connections.
3.6 Updates
The Updates feature can be used to check for additional content, including new agents, templates, demonstrations, and SDK tools.

The update button can be clicked to check for and download newly available content and features.
3.7 Test server
The Test Server utility verifies whether the Model HQ server is functioning correctly.
This diagnostic tool confirms server responsiveness and basic operational status.
3.8 Model downloader
The Model Downloader manages the installation of the standard model set.

The interface displays which models remain to be downloaded to complete the standard model set installation. Models can be selected and downloaded as needed based on use case requirements.
3.9 Inference logs
Inference transactions can be stored in the database for logging and analysis purposes.
This feature maintains a record of all inference operations, enabling performance tracking, debugging, and usage analytics.
3.10 Sample documents
The Sample Docs option allows example document packages to be downloaded. These samples are useful for:
- Testing parsing pipelines
- Benchmarking extraction workflows
- Understanding document ingestion formats

The preferred document package can be selected and will be downloaded into the local workspace for testing and validation purposes.
3.11 System information
The System Info option can be selected to view hardware and software configurations detected by Model HQ.

This diagnostic display helps assess whether the environment is suitable for downloading and running specific models. The system information includes details about available memory, processor type, disk space, and GPU availability. For detailed system requirements, the System Configurations documentation can be consulted.
Conclusion
This document explains the Tools section in Model HQ. The Tools area gives you helpful features for setting up, managing, and running the system more easily.
It includes things like the Backend Server, which lets Model HQ run in the background, the CLI, which lets you use commands instead of buttons, and the SDK, which helps developers connect Model HQ to their own apps or programs. The Share feature also makes it easy to give others access.
There are tools to check that everything works correctly. System Info shows what your computer can handle, and Test Server makes sure the server is running properly before you launch your models.
The Model Downloader helps you install models quickly, and Sample Documents give you test files to practice with. The Demos section includes ready-made examples you can try right away, and Updates keeps your agents, templates, and tools up to date.
All together, these tools make Model HQ more than just a simple app — they turn it into a flexible platform that developers, teams, and organizations can customize and connect to bigger systems.
Learning how to use the Tools section is especially helpful for advanced users and teams running Model HQ in real-world projects.
For further assistance or to share feedback, please contact us at support@aibloks.com