Model HQ
DocumentationFrom Data Plate to Inbox: Turn a Single Photo into a Powerful Customer Email with Model HQ
Transform field service into a sales engine with automated photo-to-email workflows
The Challenge
It's a sweltering summer in the NYC area — home base for Model HQ — and like many, we recently ran into an unexpected crisis: our AC unit gave out.
No big deal, right? Just call in a tech for a quick fix.
But here's the twist: ❌ the unit wasn't repairable. It was running on R22, a refrigerant banned in the U.S. for years due to its environmental impact.
We were stunned — we'd been faithfully maintaining this system with regular servicing. Why didn't anyone tell us sooner?
That's when it clicked. This isn't just our problem — it's a nationwide issue affecting millions of legacy AC units. So, we built a fix of what we would do if we had an AC company. 🔧
And it's not just for HVAC…
This "photo-to-email" workflow can be easily adapted across many industries and use cases:
One image. One workflow. Endless automation.
Snap. Analyze. Email.
With Model HQ, we built an automated agent workflow that takes:
—all in seconds.
Why It Matters
This workflow doesn't just automate technician follow-ups. It creates instant, data-driven customer engagement — and a seamless path to value-added services.
📣 Free marketing ideas, anyone? Because this one just turned field service into a sales engine.
Step-by-Step Process
Download the Image and Files you will Need to Run this Demo
AC Unit Data you will need to create a look-up database (need to provide access to file)Inputting the Correct Gmail Credentials
Make sure that you have filled in the Sender Email Address and Sender Email App Access Password (this is different than your normal password) in Model HQ in:
If you don't have an App Access Password, you must enable 2-Factor Authentication for your Gmail account, and click on "Create and manage your app passwords" under this website:
https://support.google.com/mail/answer/185833?hl=en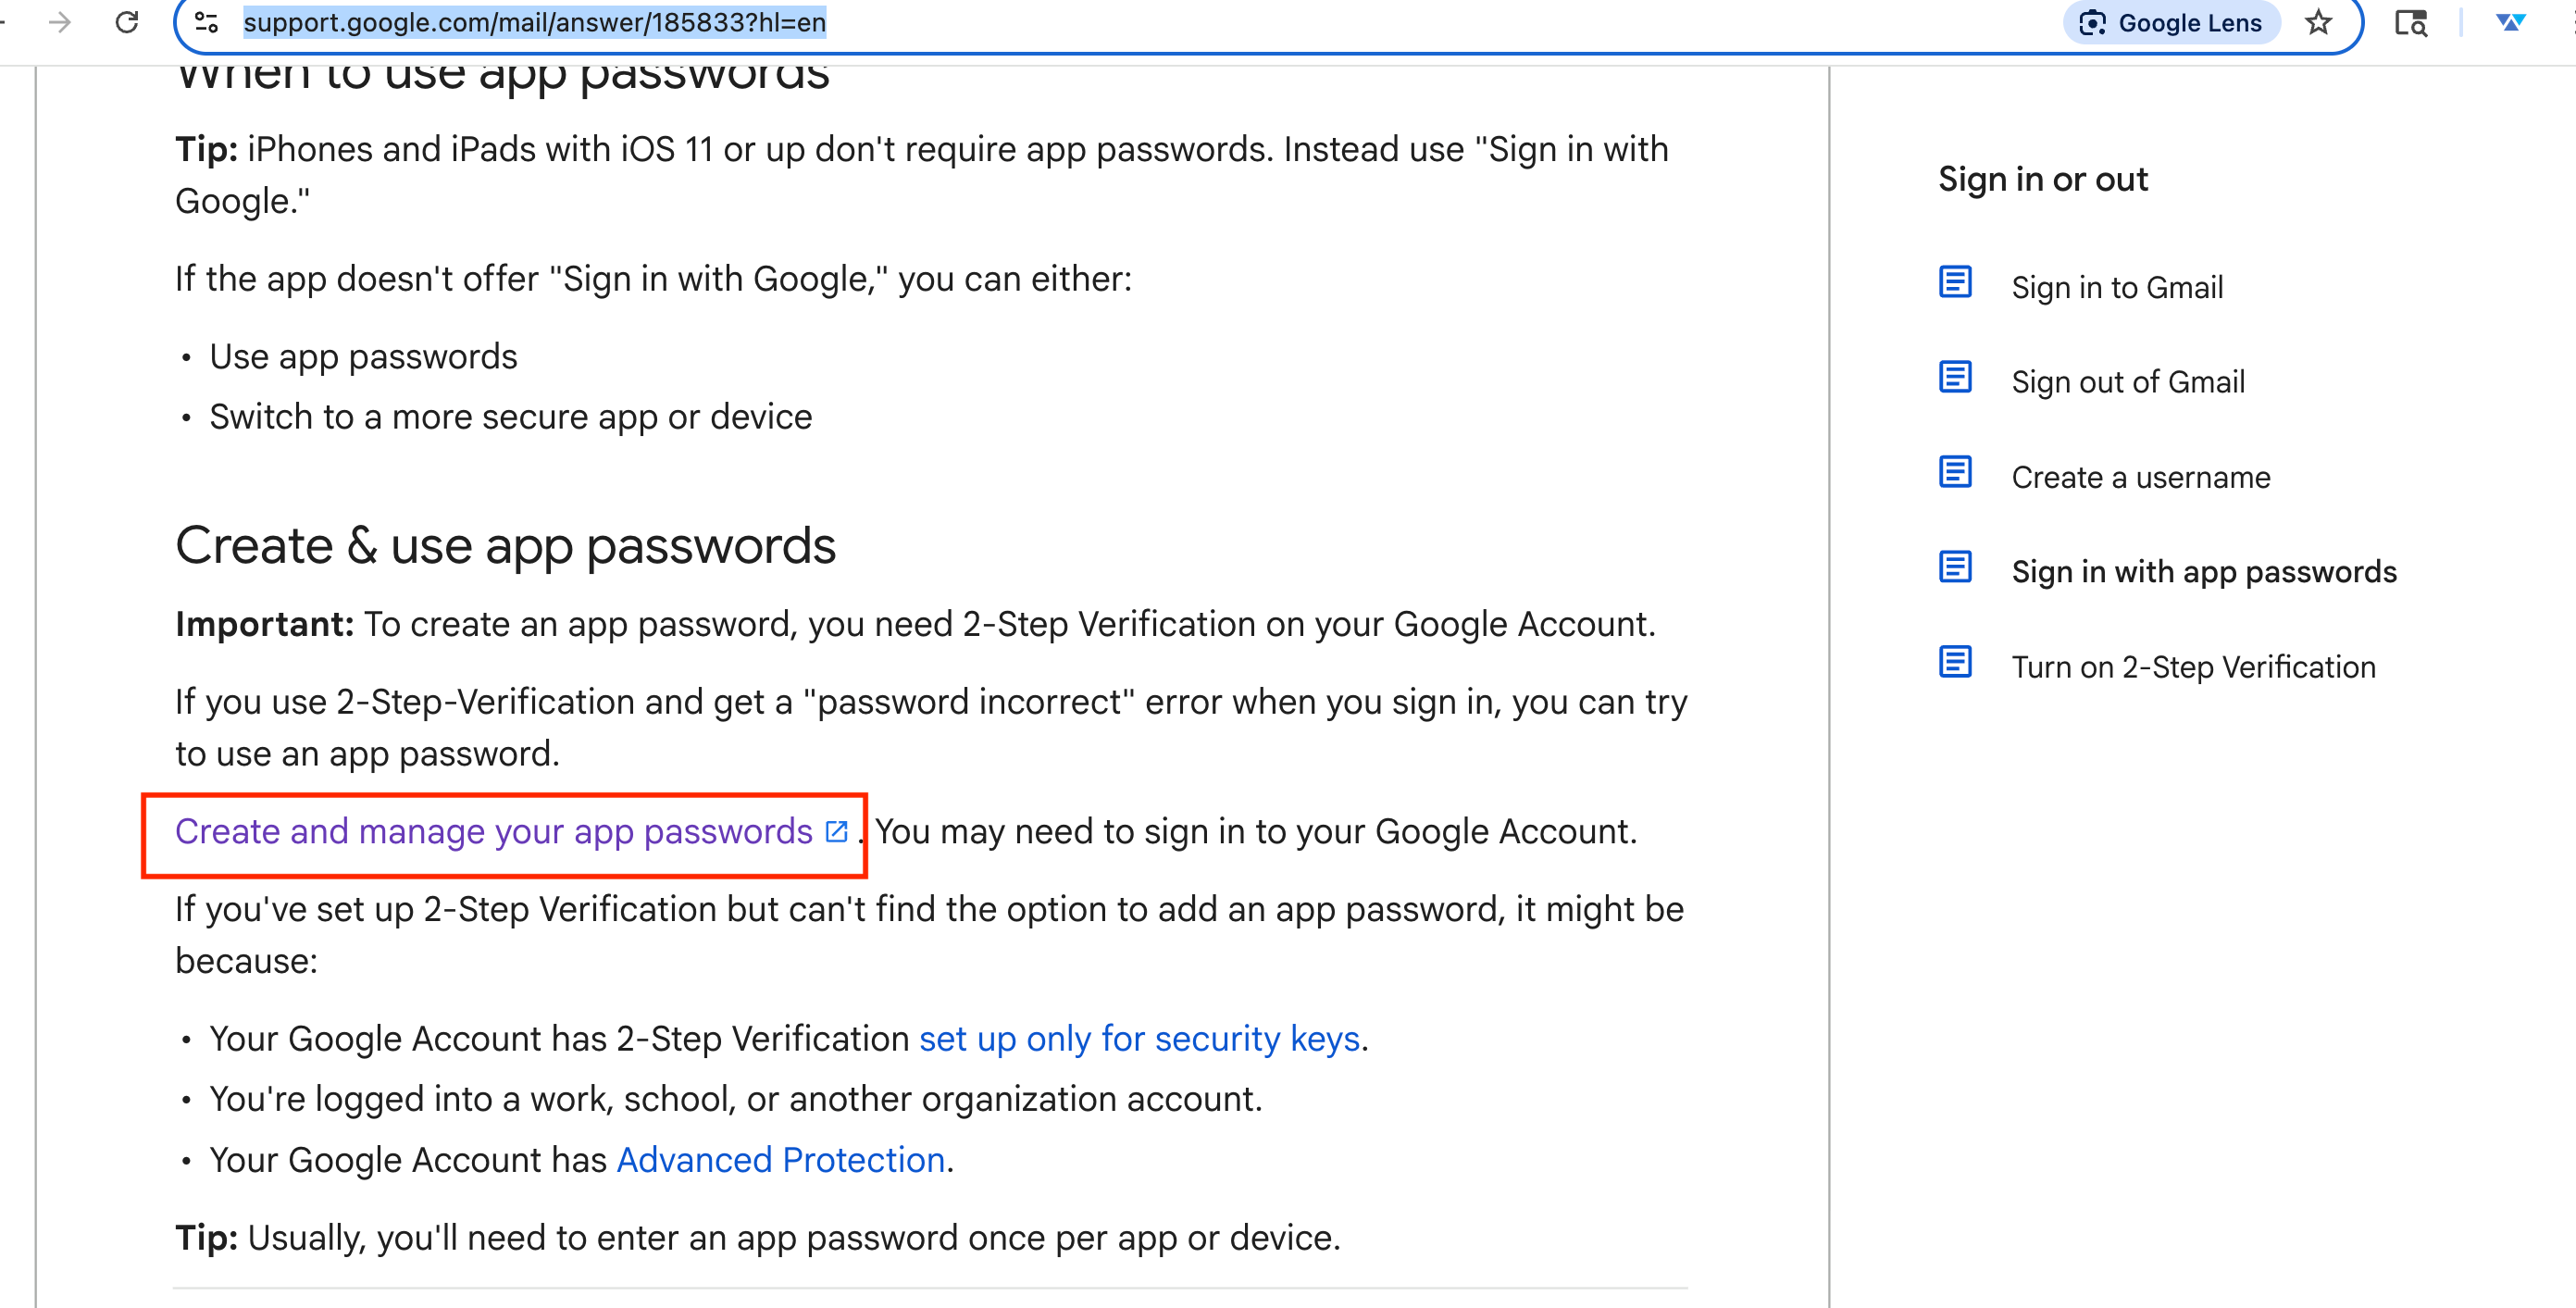
Building the Agent, Starting with Specifying the Right File Input
Start Building a New Agent by going to Agent > Build New > Start Building > then name this new Agent AC Marketing
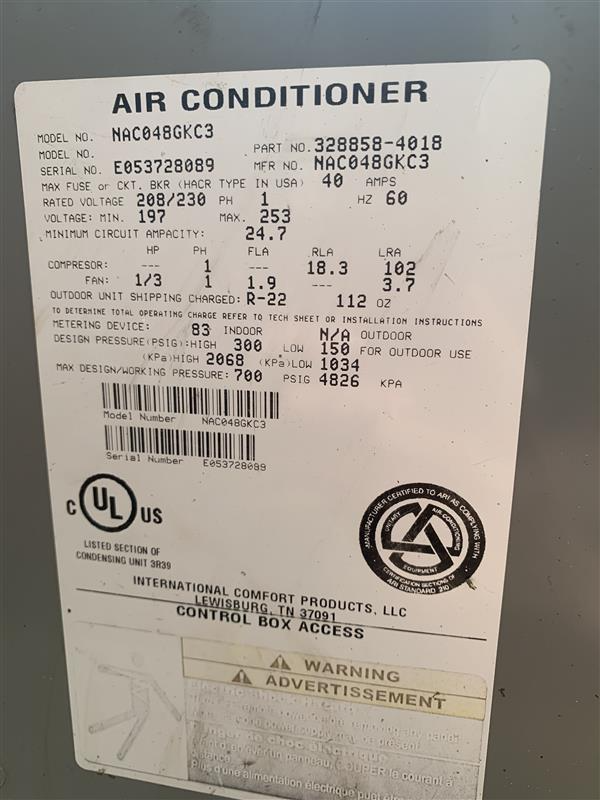
As with all Agent Process, start by specifying the File Inputs from the User. Here, we will ask the AC Tech to input a photo of the Data Panel (the photo we downloaded above), and provide the name and email address of the customer (the AC tech will manually enter this info for this demo).
Using the Vision Agent to auto-extract the model number from the panel image
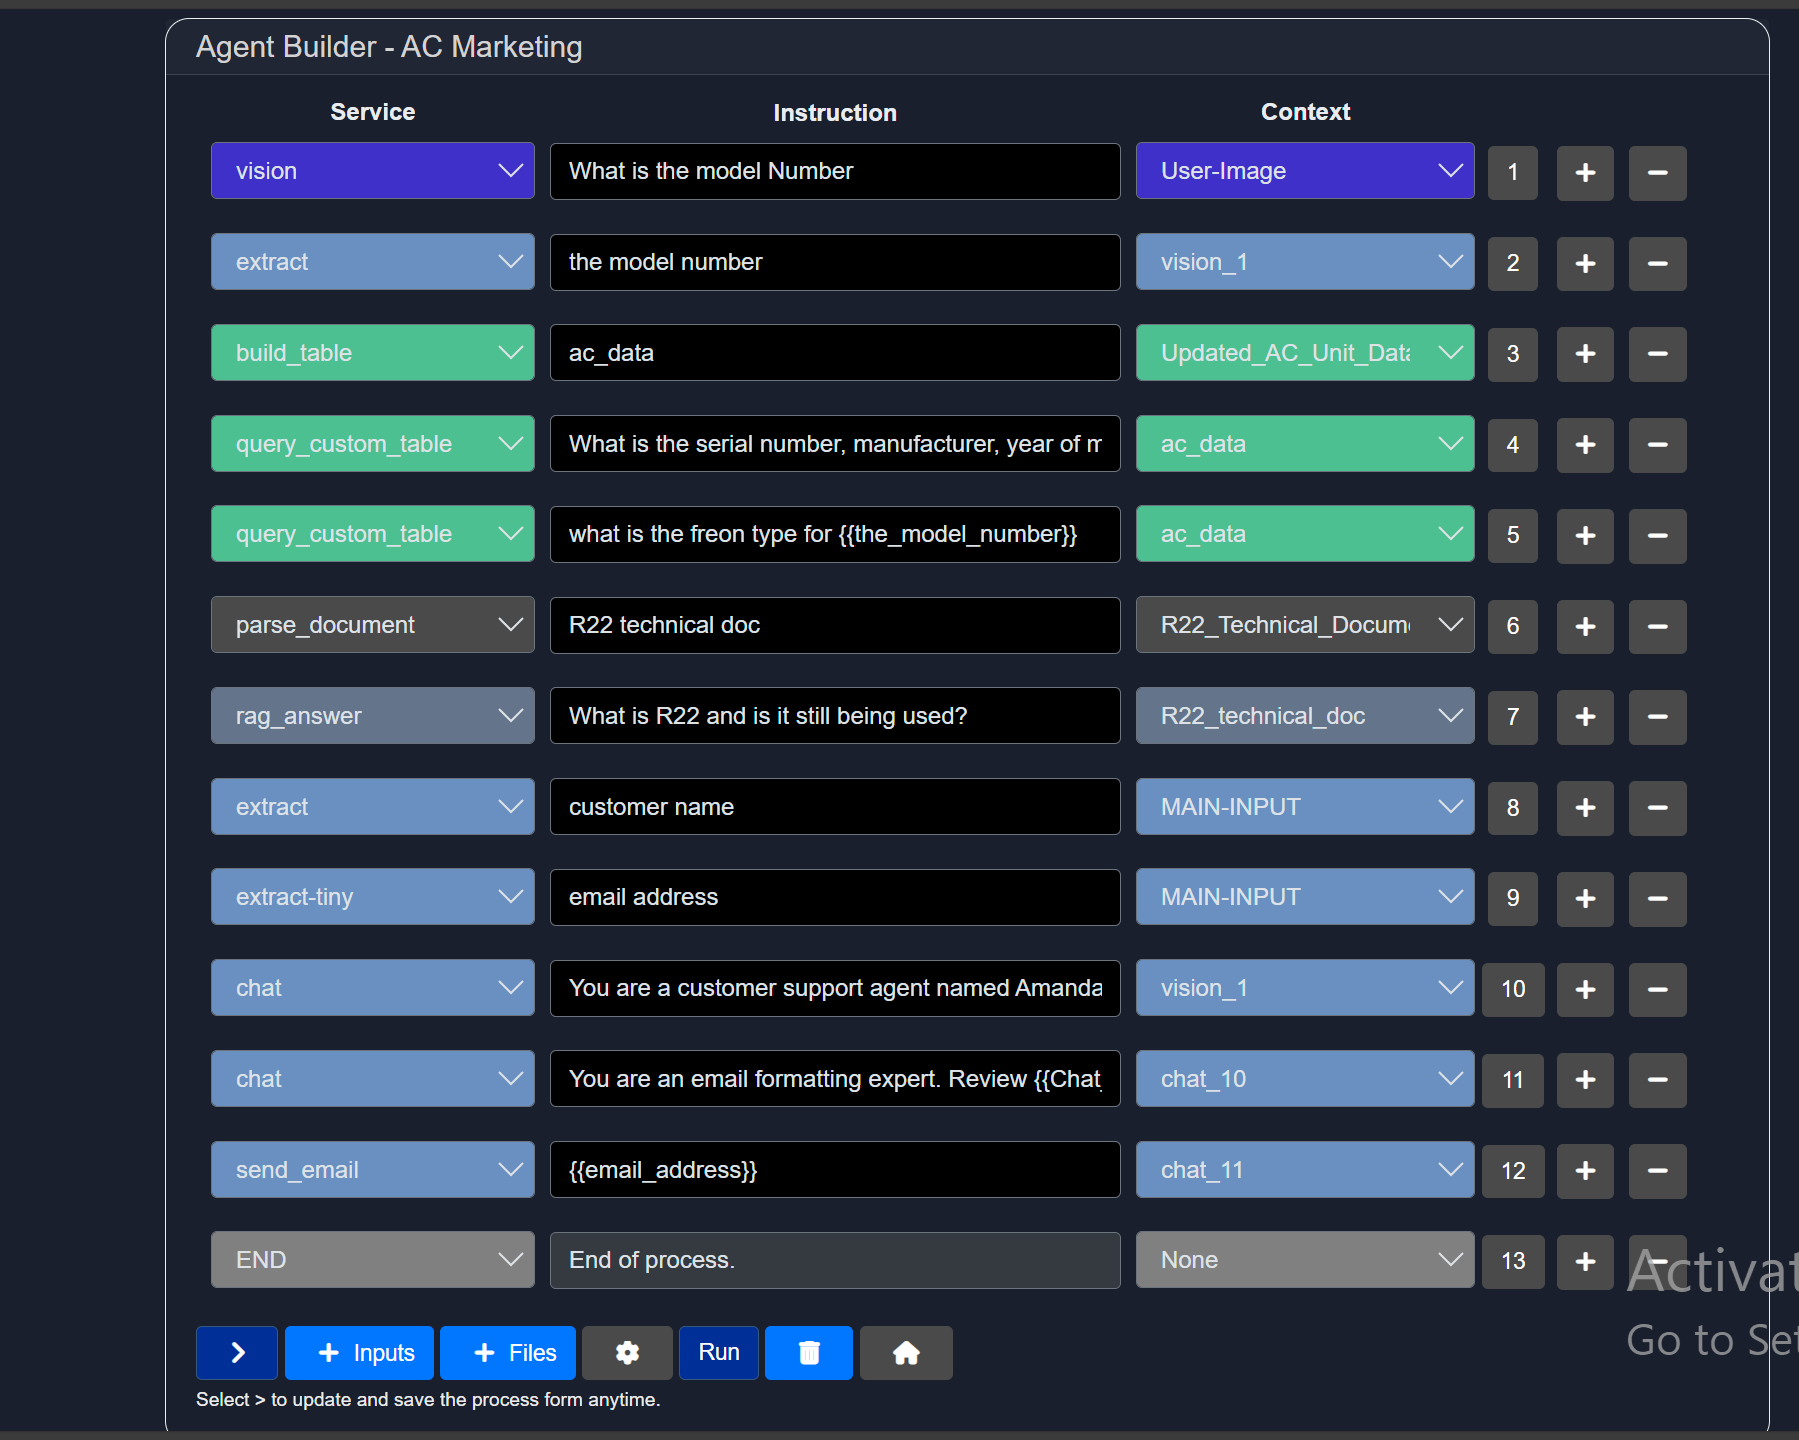
Row 1:
What is the model number?User ImageUsing an extract Agent to extract a clean model number
You may find that the Vision Model can be extra-chatty and volunteers too much information. This is where an Extract Agent comes in handy to read through the chatty text the Vision Model produces to get exactly the information we need to be able to automatically query our dataset using our Text to SQL agent.
Row 2:
the model numberVision_1 (We are asking the Extract agent to pull the information gathered from the Vision agent in Step 1).Adding a Built-In Database to the Agent Workflow
This is where we build a table of the .CSV file for the query. Not only that, we will have this .CSV file BUILT-IN to the process as a permanent source so that the user does not have to input this source each time this process is run.
Note: Once all relevant content files are selected (in our case, the .CSV file with Manufacturer Name and the Document file with the R-22 Technical information), Click 'Save + Exit'. It is important to confirm your selection by clicking 'Save + Exit' at this step. Simply pressing the Home button may cause you to lose the files you just uploaded.
Building a Table of AC Unit Data
Now that we have specified the built-in databases for this workflow, let's start building our database table.
Row 3:
ac_dataUpdated_AC_Unit_DataQuery AC Unit Database
Row 4:
What is the serial number, manufacturer, year of manufacture for {{the_model_number}}ac_dataRow 5:
What is freon type for {{the_model_number}}ac_dataBy performing these actions, the model number is used to query the AC unit table to find:
- Serial number
- Manufacturer
- Year of manufacture
A second query checks:
- Freon type (e.g., R22)
Contextual RAG Lookup
To find information on R22, we will next ask the agent parses the document: R22 Technical Documentation.pdf'
Row 6:
R22 technical docR22_Technical DocumentRow 7:
What is R22 and is it still being used?R22_Technical DocumentMatch the Customer Info
From the field tech's input (e.g., "Today we visited customer Jane Smith...and email address"): The agent extracts customer name and email address
Row 8:
customer nameMain InputRow 9:
email addressMain InputThese steps will extract the customer's name and email address – the key pieces of information we need to send an email.
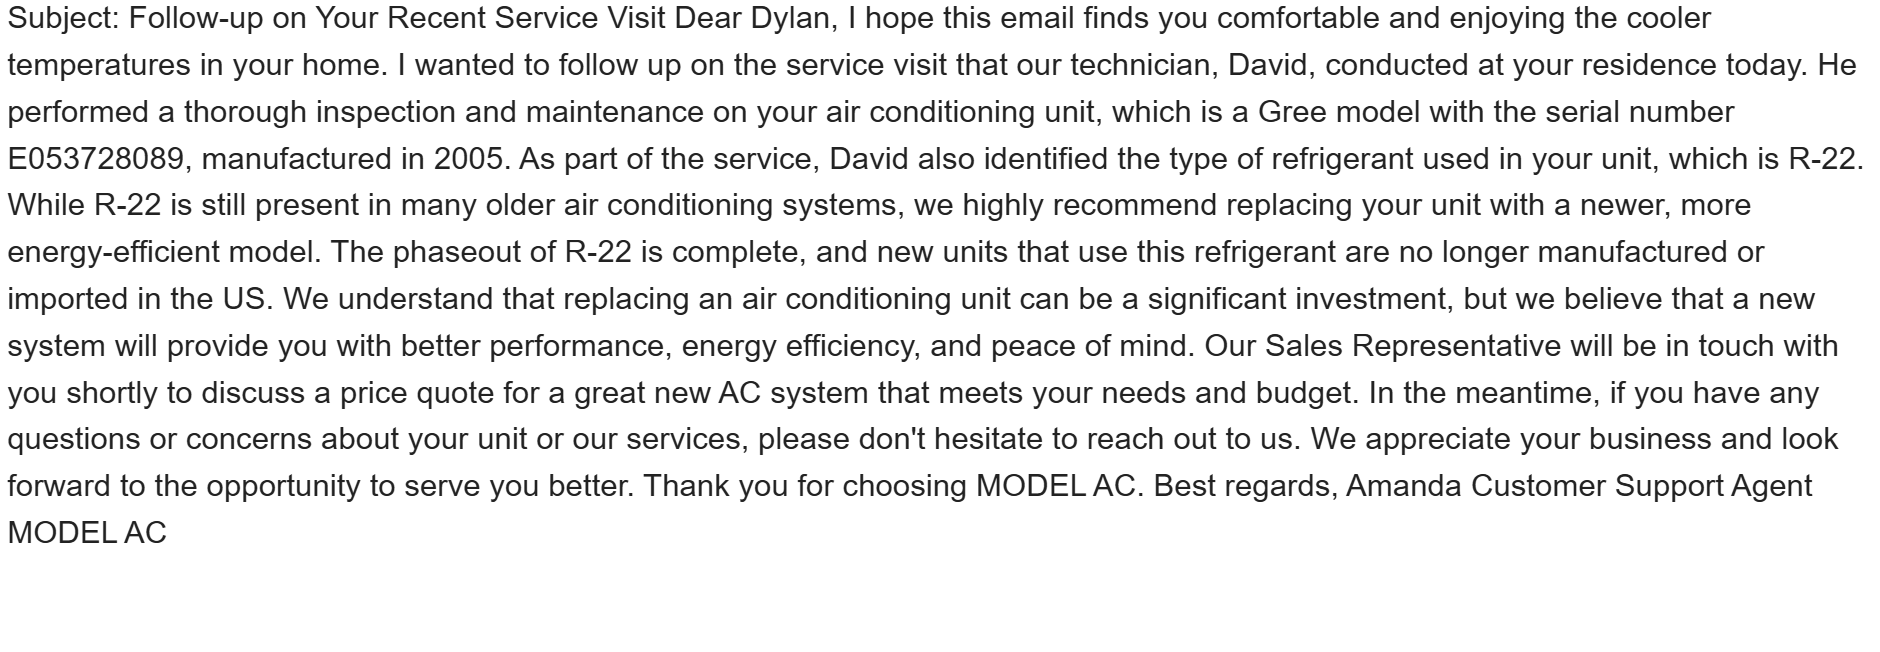
Chat Agent Drafts the Email
Using a chat model, the system generates a customer-ready email:
Personalized with:
- Customer name
- Model + Serial Number
- Year + Manufacturer
- Notes if R22 is used
- Suggests sales outreach if replacement is recommended
Row 10:
Vision 1You are a customer support agent named Amanda who works for a heating and cooling company named Model AC. Write a nice email to a customer named {{customer_name}} about our service delivery that took place today with our technician David. Using the information provided here about {{the_model_number}}, the {{query_custom_table_4}}, the {{query_custom_table_5}} and {{rag_answer_7}}, reference the exact unit, including serial number, model, manufacture and year of manufacture of the AC unit which is information that is found as follows: {{query_custom_table_4}}. If the unit uses R22, mention to the customer that we highly recommend replacing the unit and that the Sales Rep will contact them with a price quote on a great new system. Do not use brackets or have blanks in the email. If you can't fill in the information, don't discuss it.This creates a nice email from the chatbot – however, these chatbots come with intros about the steps they took to create the email, so the next step is also necessary.
Row 11:
Chat_11You are an email formatting expert. Review {{Chat_10}} and format the email nicely. Do not included any responses or any other text in this email other than the context. Do not add "here is" or any other responses whatsoever. This will cause the outcome to fail.A second chat step formats the email:
- Clean paragraphs
- No headers or extra labels
- Pure copy-paste ready
Send the Email
Model HQ auto-sends the formatted email to the retrieved email address using the send_email node.
Row 12:
{{email_address}}Chat_11Now that you entered all 12 rows, select '>'. This is the screenshot of what you should see:
Running the Workflow
You did it~~~ Now let's test by selecting 'Run' then 'Action' >
Main Input:
[Your Name] [email]You will see the following results
Recap Summary: What This Agent Does
| Task | Output |
|---|---|
| 🖼️ Image Input | Extracted AC model number |
| 📊 Table Query | Unit specs + refrigerant type |
| 📄 Document RAG | Info on R22 |
| 🙍♀️ Customer Lookup | Name + email address |
| 📨 Email Generation | Personalized & well-formatted |
| 🚀 Final Step | Sends the email automatically |
🖼️ Image Input
Extracted AC model number
📊 Table Query
Unit specs + refrigerant type
📄 Document RAG
Info on R22
🙍♀️ Customer Lookup
Name + email address
📨 Email Generation
Personalized & well-formatted
🚀 Final Step
Sends the email automatically
Need Help?
If you encounter any issues while setting up this workflow, feel free to contact our support team at support@aibloks.com.