Model HQ
DocumentationExploring agents in Model HQ
From the Main Menu, open the Agents section to start building automated workflows. Agents chain together document parsing, RAG retrieval, model inference, and structured output generation into a single repeatable process — useful for jobs like contract analysis, customer support, research summarization, financial data extraction, and image tagging.
You can run an agent on one file or many at once, with results delivered as Word reports, CSVs, JSON, summaries, or plain text. The Agents interface lets you build agents from scratch (drag-and-drop visual builder or multi-step no-code editor), run ready-made templates, edit and share workflows, and create demos to illustrate use cases. Pre-built examples are included and fully customizable.
Each run executes step-by-step — parsing documents, answering RAG questions, filtering CSV data, and auto-generating reports — while inference logs surface model responses, token usage, processing time, and confidence scores at every step.
This guide covers loading and running existing agents, interpreting outputs and logs, batch processing across multiple files, sharing and uploading custom agents, and using the visual builder for workflow creation and editing — everything you need to automate complex document workflows and integrate agents into broader enterprise systems.

Build and Deploy AI Agents in Minutes on AI PCs - No Code Needed

Build Live Demos for AI Agents | Model HQ Agent Demo Mode

Sharing Agents with No Hardware Lock-In on Model HQ (Intel ↔ Qualcomm, Zero Changes)

2 On-Device Agent Demos on Snapdragon X Elite (RAG + Vision) | Model HQ + Microsoft Foundry Models

Contract Analyzer Agent in Minutes (No-Code + Offline) | Model HQ Demo

Handwriting-Reading Agent with On-Device AI | Prescription Reading Agent (no code, private)

No-Code Sentiment & Emotion Detection Agent in Model HQ (On-Device + Private AI)

Private, Local Image Agents in Model HQ: Describe Images + Extract Numbers (Fast!)

Analyze Executive Agreements with AI - on AI PC
1. Launching the agents interface
The Agent button in the main menu sidebar can be selected, or the agents option can be chosen from the home page as shown in the attached image.
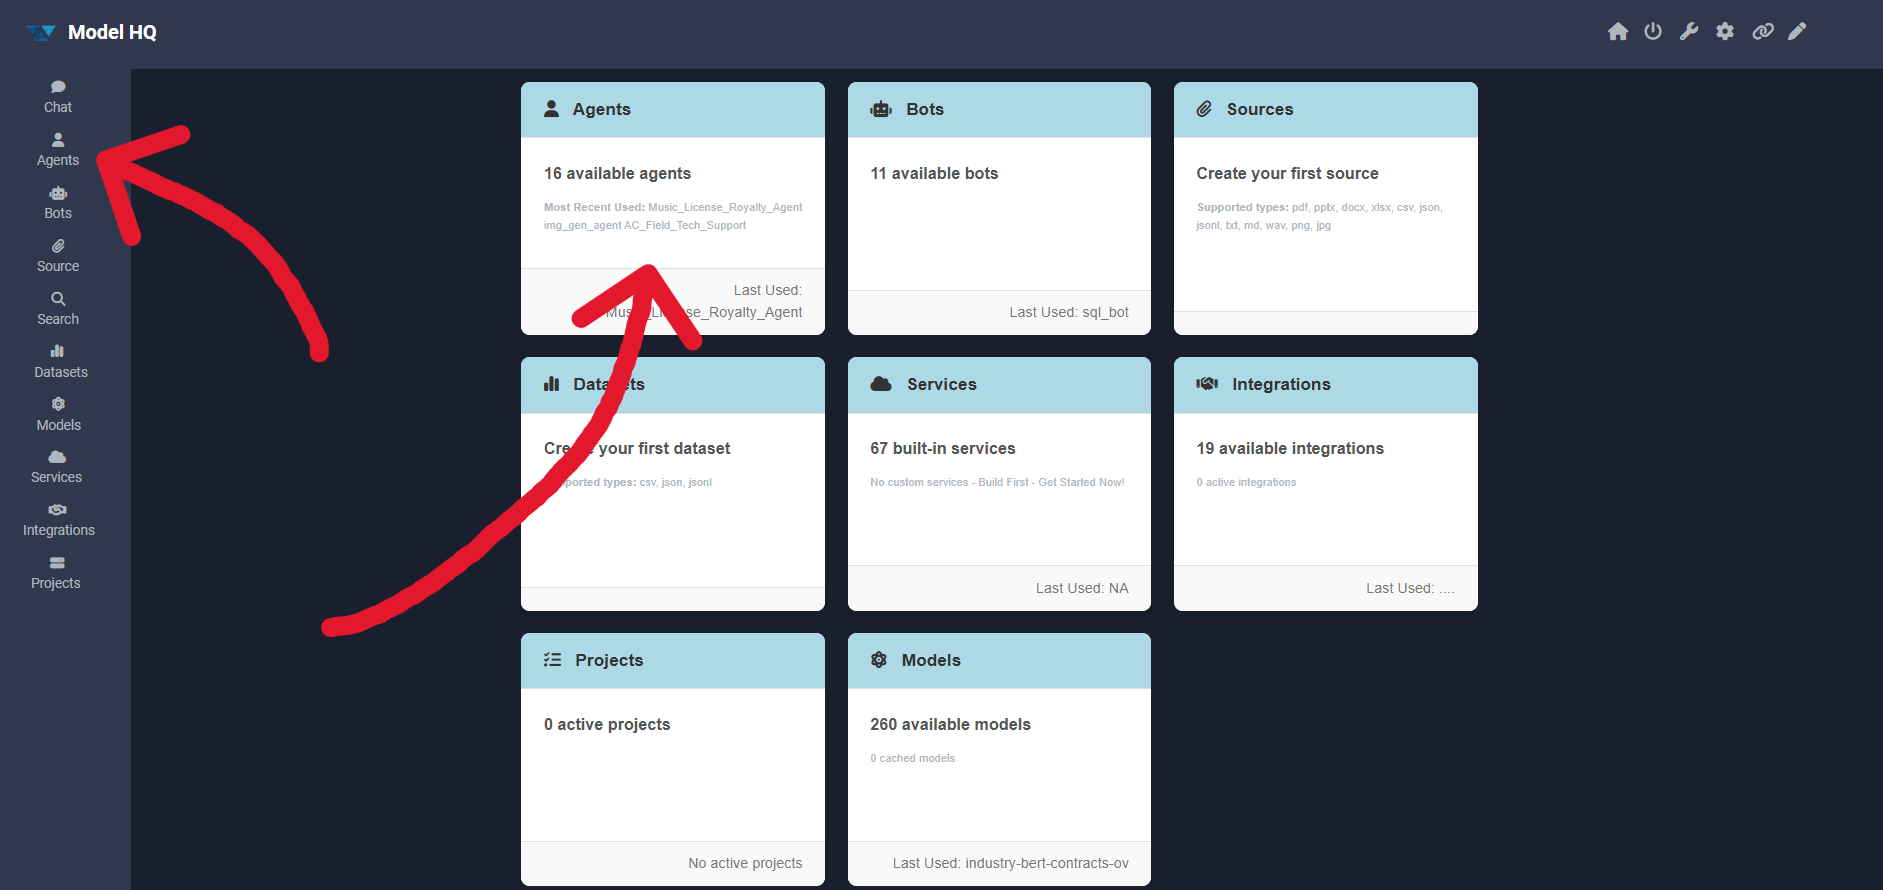
2. Agent interface overview
The Agents interface allows agents to be run, built, edited, shared, and deleted.
Here is a breakdown of the key components:
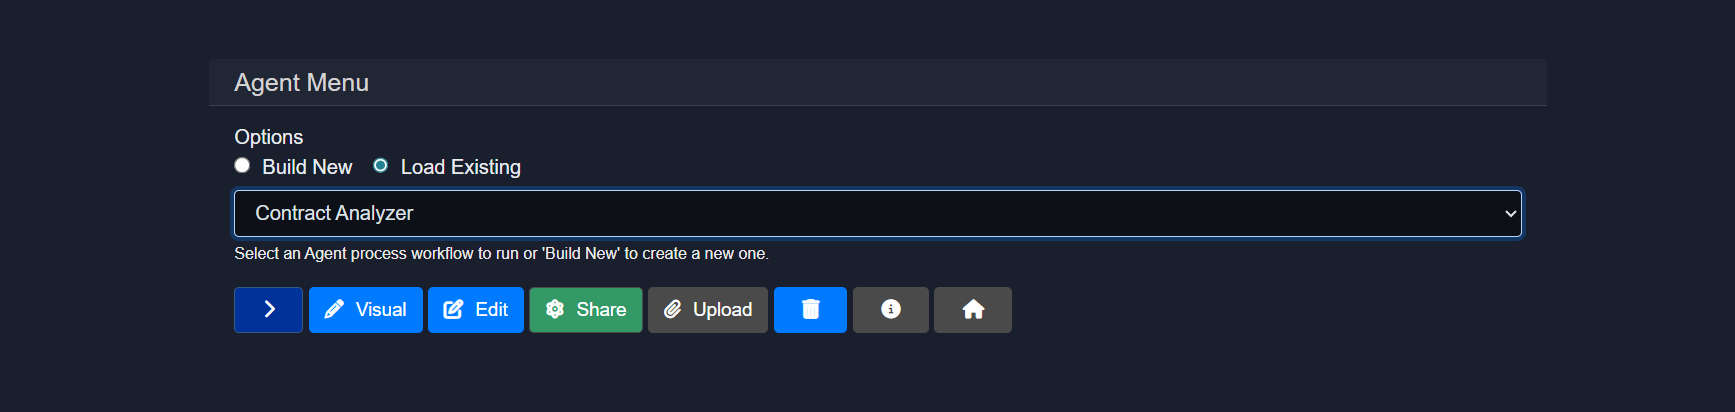
- Build New & Load Existing Options
- Build New: Creates a new agent from scratch.
- Load Existing: Loads an existing agent, either a pre-created template included in Model HQ or one previously built by the user.
- Visual: Builds agents with an open visual builder by connecting nodes and wires (no-code, easy to use agent creation mode, enabling quick workflow creation or diagrammatic understanding of agent workflows).
- Edit: Modifies an existing agent.
- Share: Shares an agent with others.
- Upload: Quickly builds an agent by uploading a pre-built file.
- Delete: Deletes an agent.
- Info Icon: Provides metadata and step-by-step information and process diagram about an agent workflow for users
This documentation does not cover building and editing agents in detail. For creating a new agent, the Create New Agent documentation should be consulted, and for editing an agent, the Edit an Agent documentation should be followed. The visual builder mode is discussed in Agent Visual Builder.
In this documentation, an existing agent will be run, and other options such as share and upload will be explained in detail.
2.1 Loading an existing agent
To load an existing agent, load existing can be selected (if not already selected), and then any of the pre-existing agents can be chosen.
Available Pre-Created Agent Templates in Model HQ
- AC Field Tech Support
- Cloud API Agent
- Conditional Agent
- Contract Analyzer
- Customer Support
- Financial Data Extractor
- Handwriting Reading Agent
- Image Tagger
- Image Generation Agent
- Intake Processing
- Intune Device Risk Agent
- Music License Royalty Agent
- Research Process
- Stock Research Agent
- Summarize Website
Select any agent from the list and click the > button to continue.
For this walkthrough, Contract Analyzer has been selected, which was specifically designed to demonstrate how complex Employment Agreements can be quickly queried using pre-built agents.
2.2 Confirming the agent
After selecting an agent, the following interface will be displayed:
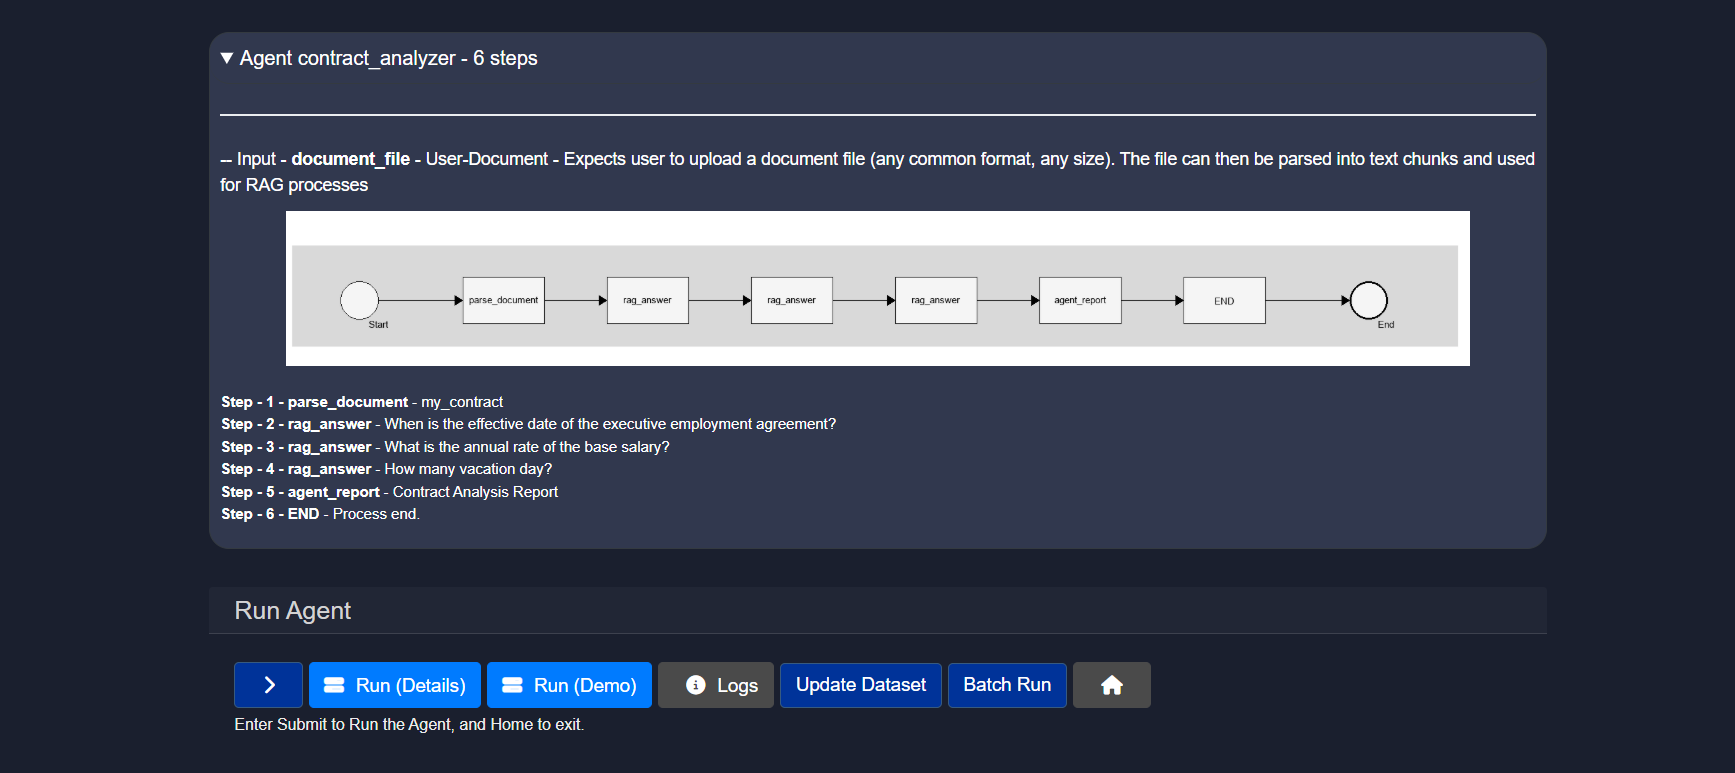
Once the user selects and agent and clicks ">", details about the agent will be provided along with the complete process flow from input to output by expanding the top bar with the agent name and the number of steps.
In the Run agent section, 2-3 options will typically be available:
- Run (Details)
- Run (Demo)
- Batch Run
2.3 Running the Agent
2.3.1 Run (Demo)
Demo mode is available for all of the Pre-Created Agent templates listed above in Section 2.1. When you select this mode, the agent will run automatically from start to finish. You’ll see a clear explanation of the input, watch each step as it runs, and view the final output.
2.3.2 Run (Details)
Run (Details) enables the agent to be executed.
User input will be requested based on the agent's configuration, such as text input or file upload.
If the required model(s) are not downloaded to run this agent, the models will be downloaded step-by-step as needed.
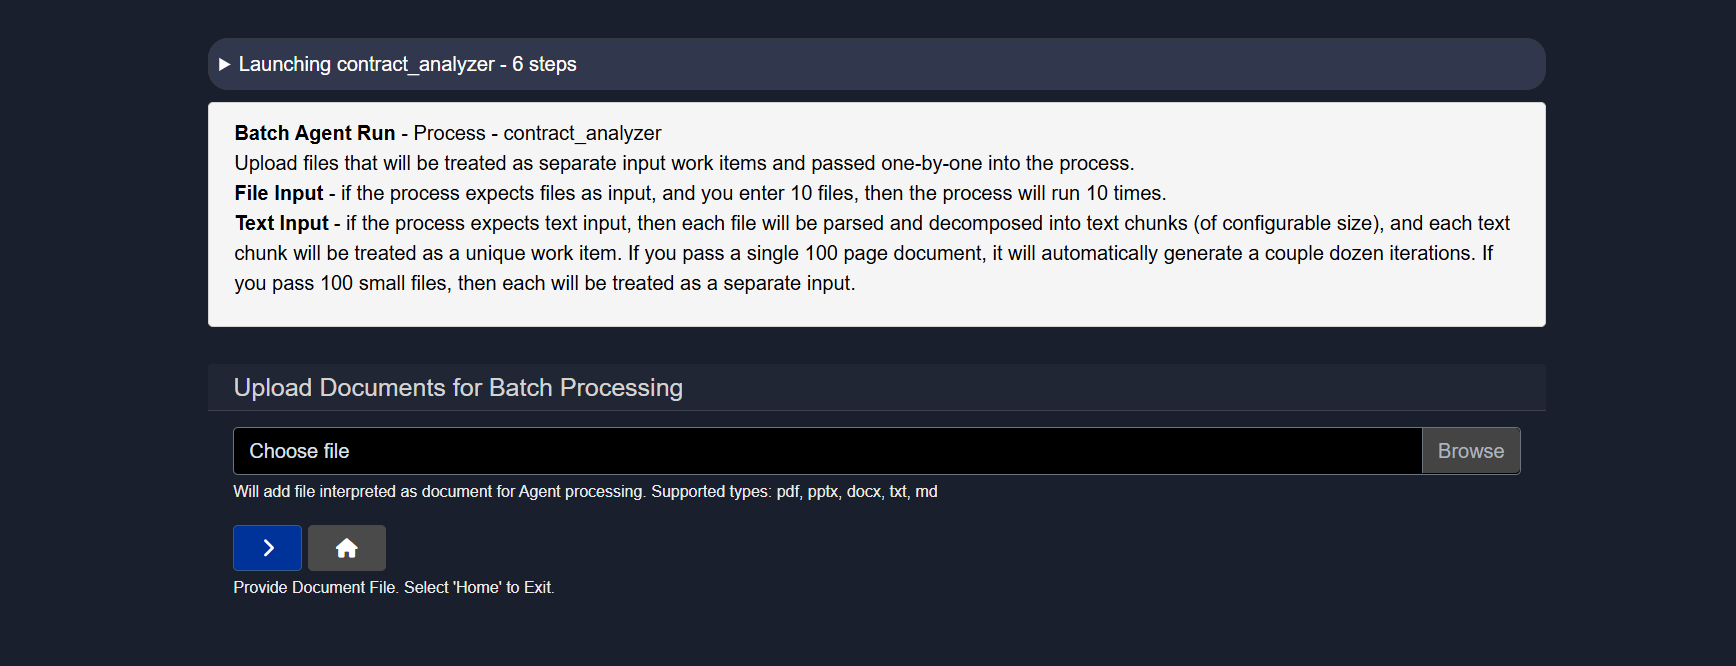
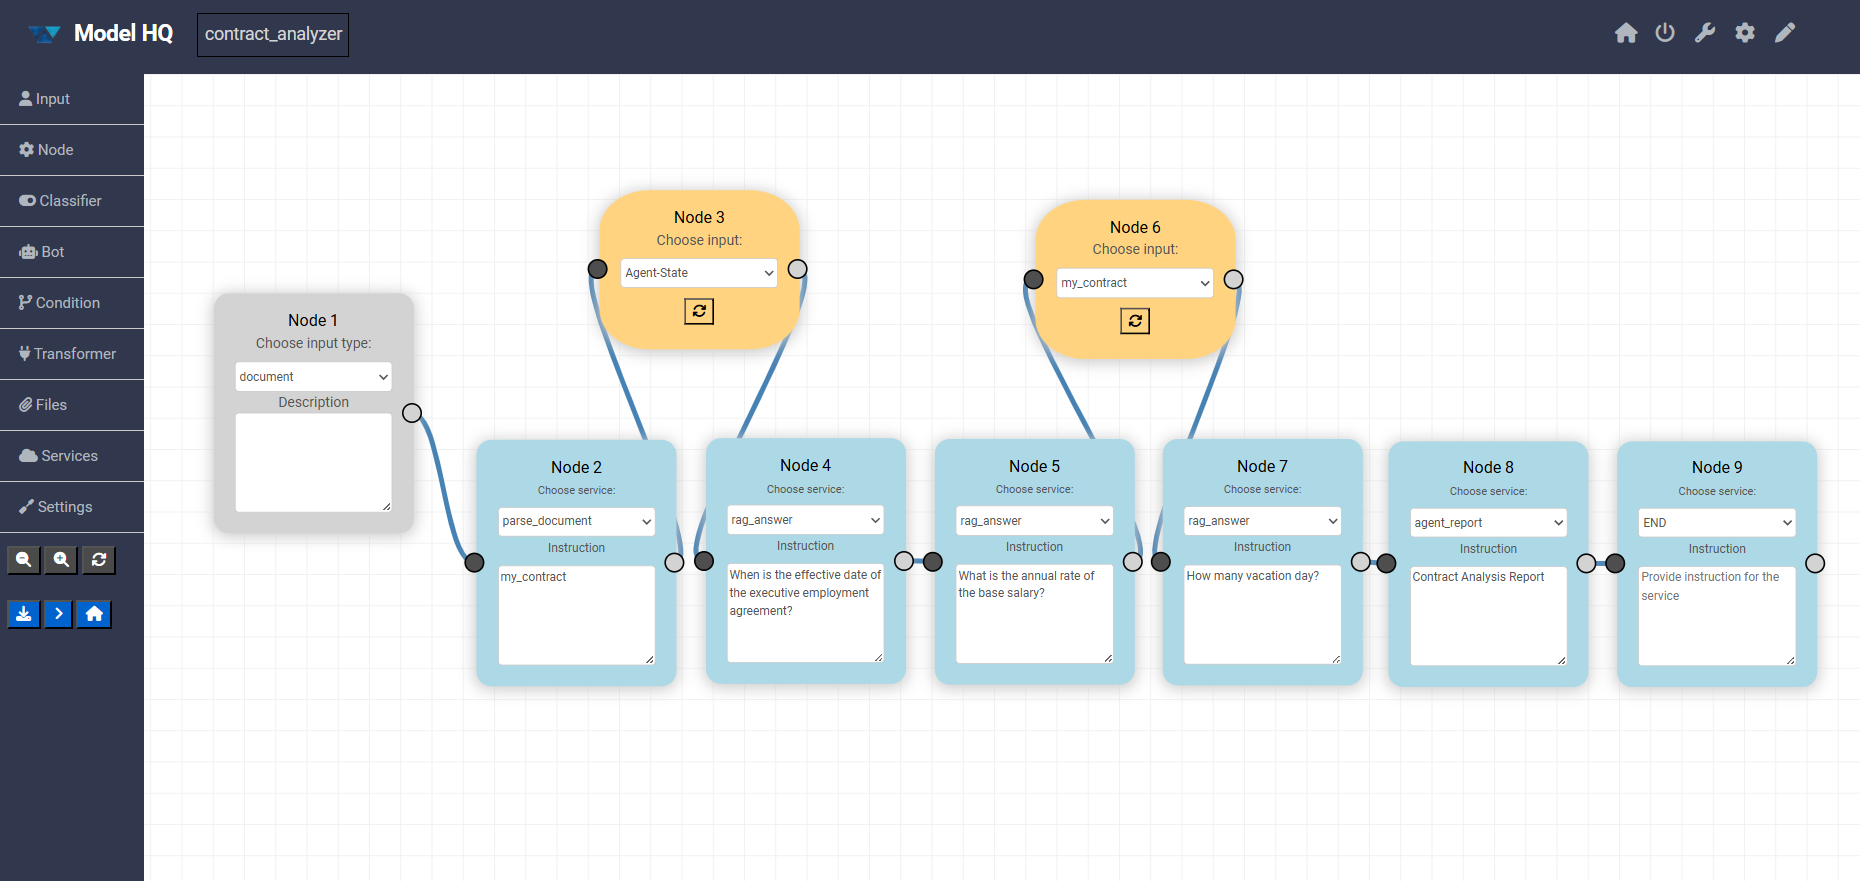
In the selected agent (Contract Analyzer), a file is required as input. Since it is a contract analyzer agent, a contract document is needed for analysis. The complete breakdown of all steps for this agent is as follows:
Step 1 - parse_document - my_contract Step 2 - rag_answer - When is the effective date of the executive employment agreement? Step 3 - rag_answer - What is the annual rate of the base salary? Step 4 - rag_answer - How many vacation day? Step 5 - agent_report - Contract Analysis Report Step 6 - END - Process end.Uploading a File as Input
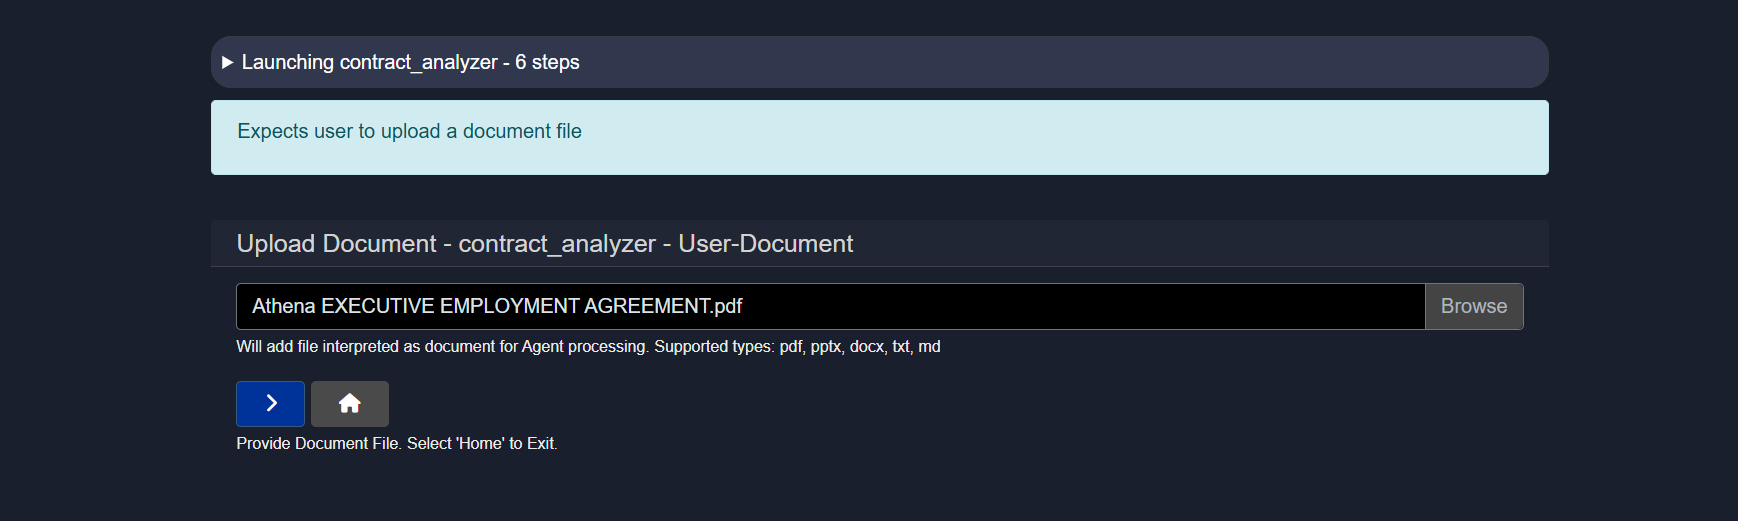
Model HQ includes sample executive employment agreement documents that can be used to test this agent. These files are located in:
c:\users\{user name}\llmware_data\sample_files\agreementsThis sample agent demonstrates how documents can be queried using pre-built agents in an automated workflow, using one of the provided Executive Employment Agreements as an example.
(Supported file types are .pdf, .pptx, .docx, .txt, and .md.)
Once the file has been added, the process can proceed to the next step.
Once the file is uploaded, the agent will begin executing the defined workflow automatically.
No further user action is required at this stage.
The agent will process the input and generate output as defined in its configuration.
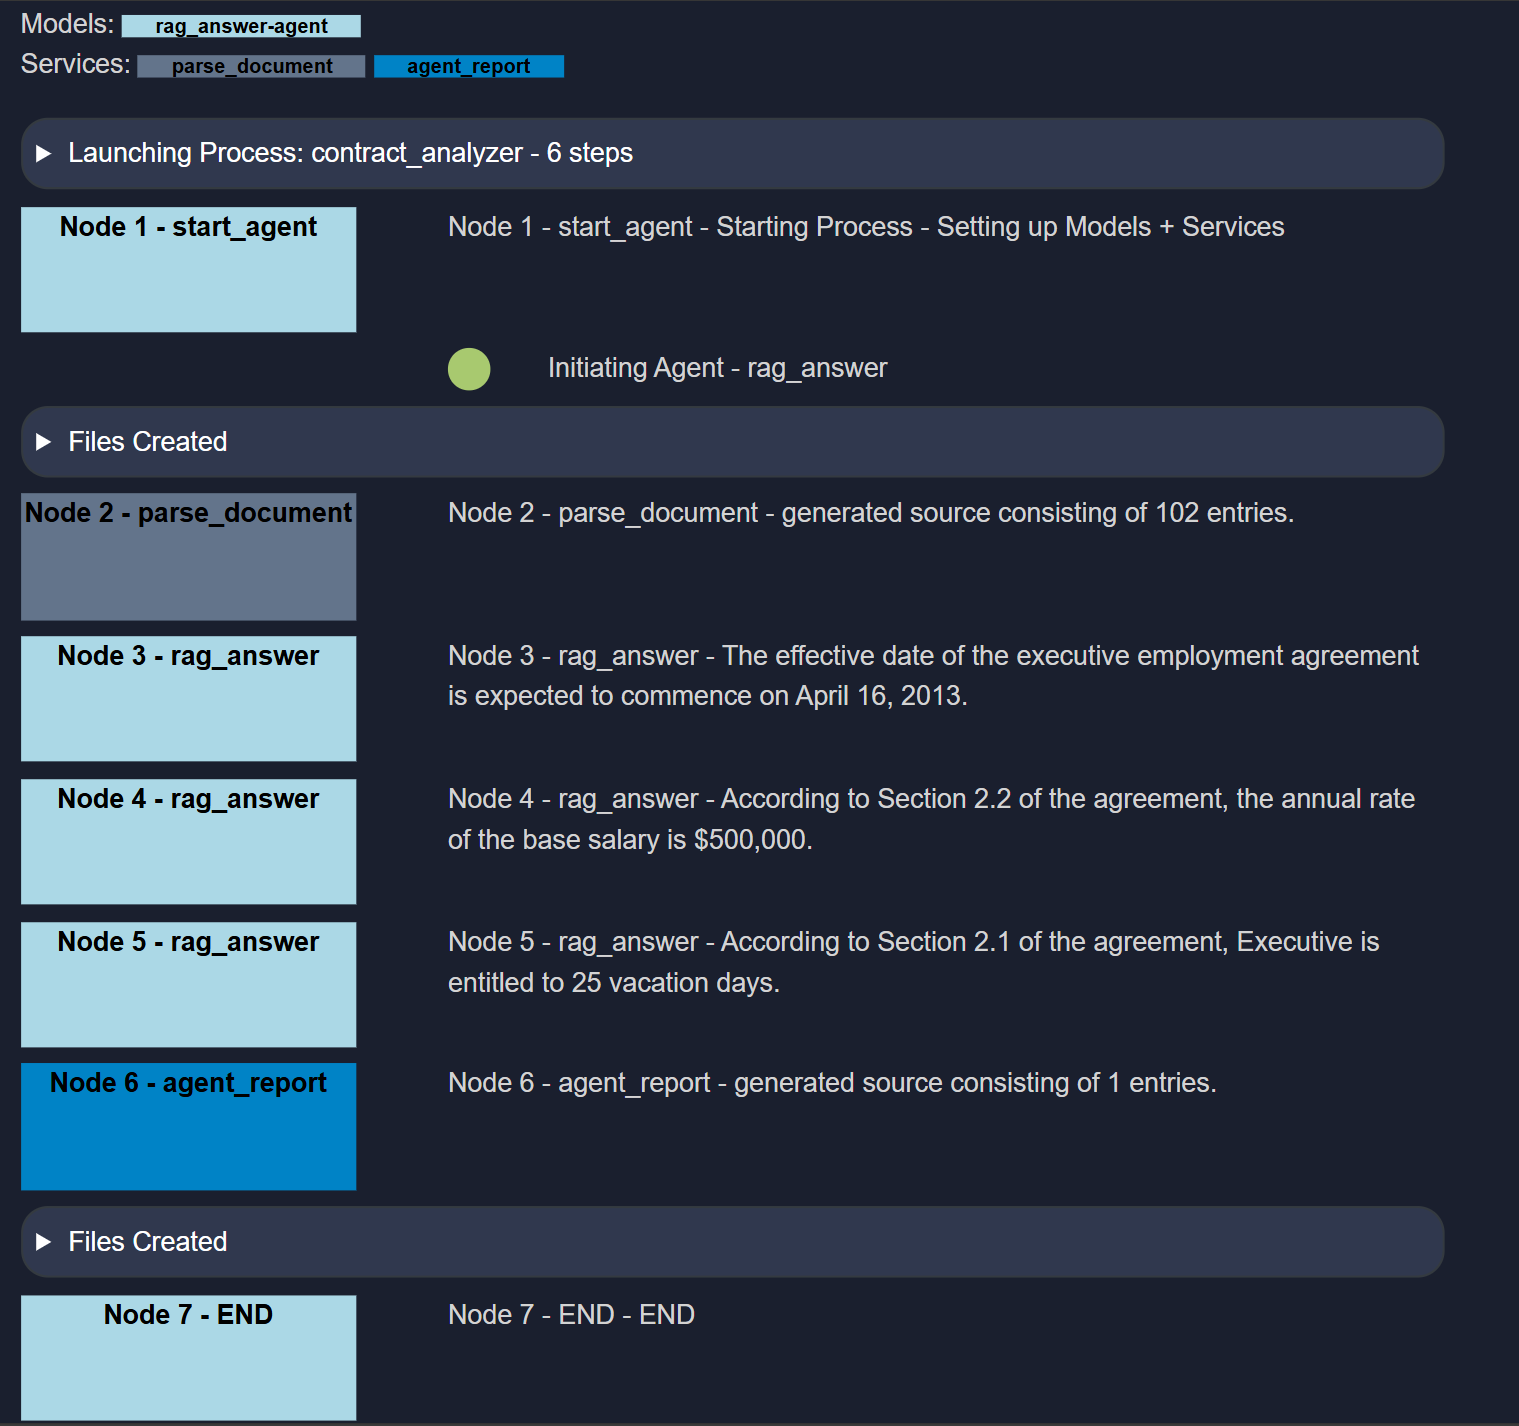
Once all processes have been completed, a summary report table will be created according to the 5th step (agent_report - Contract Analysis Report).
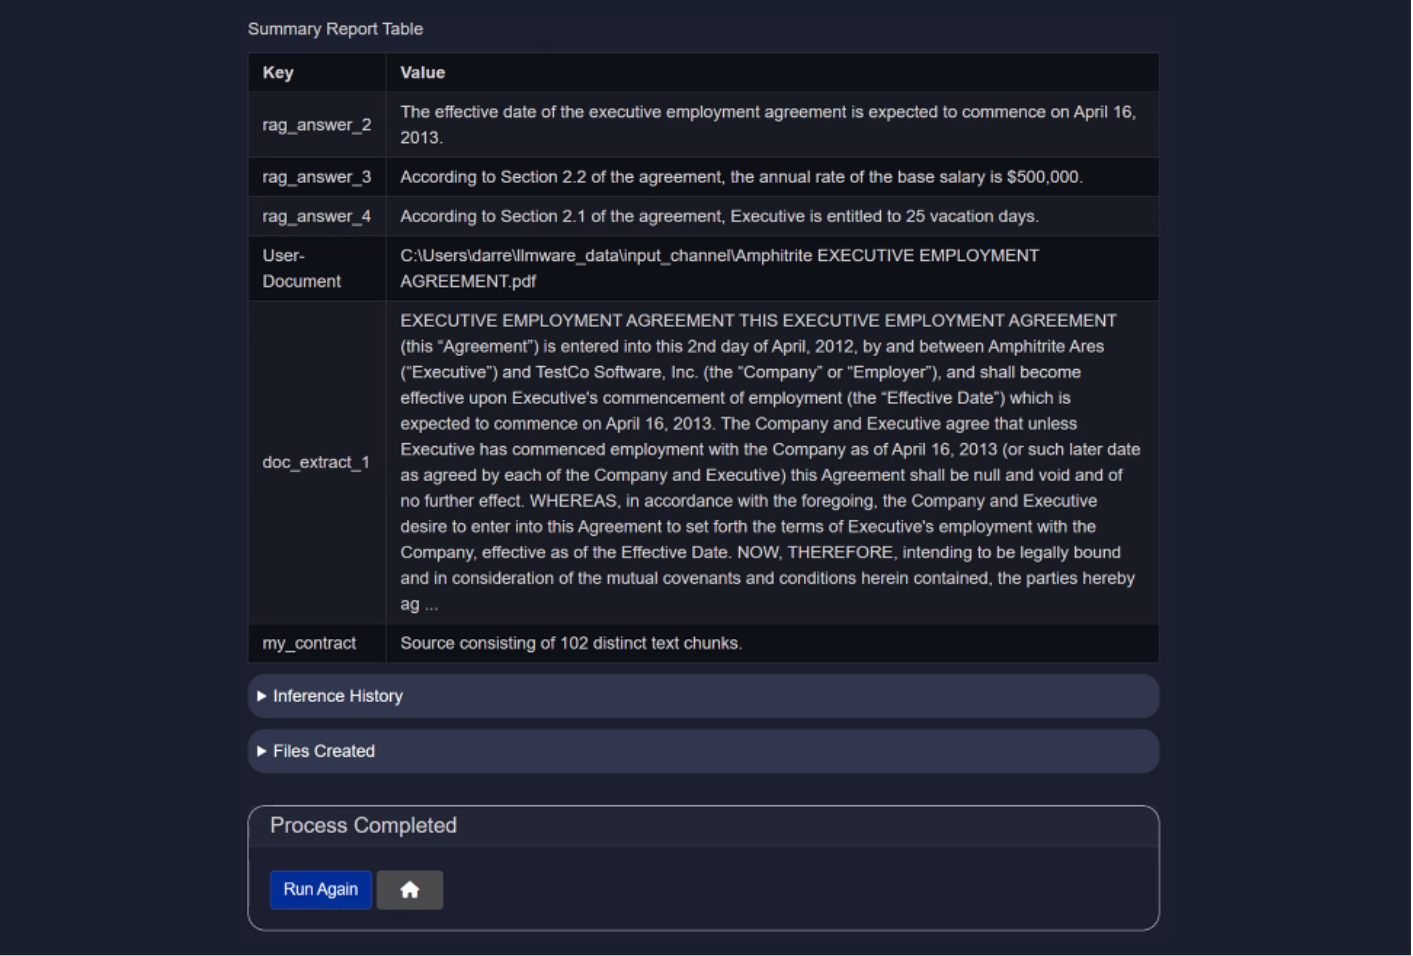
For every output, inference history and created files will also be available.
2.3.2.1 Inference history
The Inference History table provides detailed logs of each inference performed by the language model, enabling transparency, performance tracking, and auditing. This is particularly useful for AI-driven processes such as contract analysis, customer support, and research workflows.
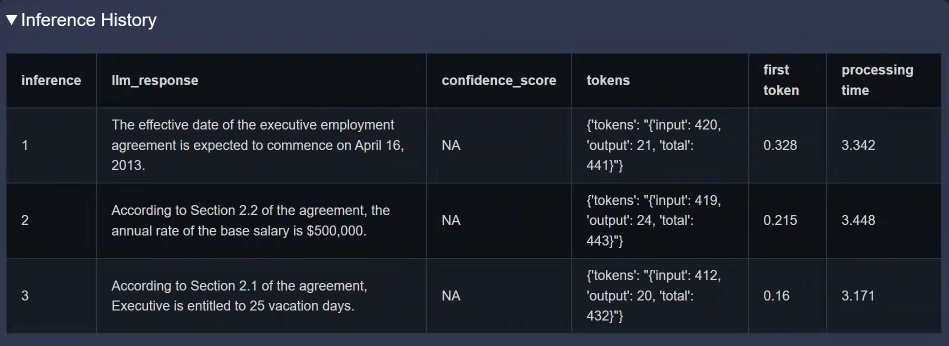
| Column | Description |
|---|---|
| inference | A sequential identifier for each inference operation. |
| llm_response | The text response generated by the language model (LLM) based on the input context. |
| confidence_score | The model's confidence level (if available). NA indicates not applicable. |
| tokens | Token statistics, including input tokens, output tokens, and total tokens processed. |
| first token | Time (in seconds) taken to generate the first token of the response. |
| processing time | Total time (in seconds) taken to process and return the complete response. |
Column
inference
Description
A sequential identifier for each inference operation.
Column
llm_response
Description
The text response generated by the language model (LLM) based on the input context.
Column
confidence_score
Description
The model's confidence level (if available). NA indicates not applicable.
Column
tokens
Description
Token statistics, including input tokens, output tokens, and total tokens processed.
Column
first token
Description
Time (in seconds) taken to generate the first token of the response.
Column
processing time
Description
Total time (in seconds) taken to process and return the complete response.
2.3.2.2 Files created
This section lists the output files generated by the Contract Analyzer Agent. Each file captures a distinct part of the analysis—ranging from visual diagrams to raw metadata and final summaries—making it easier to trace the agent's behavior and audit results.
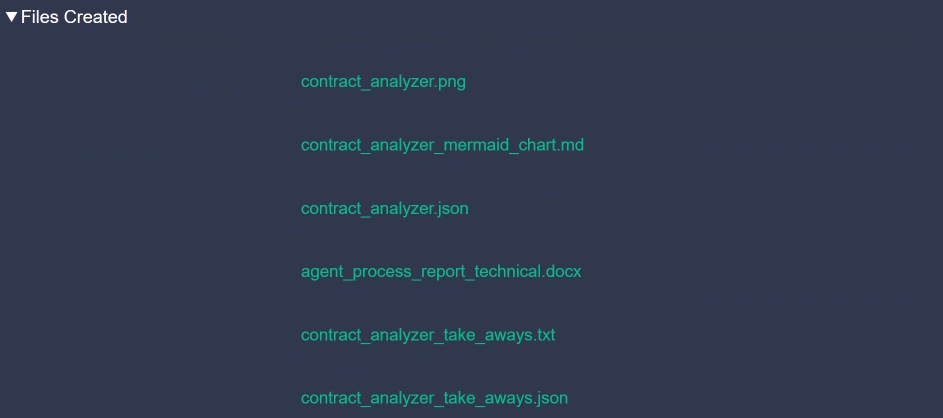
| File Name | Description |
|---|---|
agent_name.png | A visual representation (e.g., diagram or flowchart) of the contract analysis process or structure. |
agent_name_mermaid_chart.md | A markdown file containing a Mermaid.js chart definition that visually maps the agent’s workflow. |
agent_name.json | A structured JSON file containing the raw data or metadata extracted by the agent from the contract. |
agent_process_report_technical.docx | A detailed technical report describing the internal processing steps, models used, and outcomes. |
agent_name_take_aways.txt | A human-readable text summary highlighting key insights and findings from the contract. |
agent_name_take_aways.json | A structured version of the takeaways in JSON format for use in APIs, dashboards, or further parsing. |
File Name
agent_name.png
Description
A visual representation (e.g., diagram or flowchart) of the contract analysis process or structure.
File Name
agent_name_mermaid_chart.md
Description
A markdown file containing a Mermaid.js chart definition that visually maps the agent’s workflow.
File Name
agent_name.json
Description
A structured JSON file containing the raw data or metadata extracted by the agent from the contract.
File Name
agent_process_report_technical.docx
Description
A detailed technical report describing the internal processing steps, models used, and outcomes.
File Name
agent_name_take_aways.txt
Description
A human-readable text summary highlighting key insights and findings from the contract.
File Name
agent_name_take_aways.json
Description
A structured version of the takeaways in JSON format for use in APIs, dashboards, or further parsing.
In the screenshots above and below, the name
contract_analyzeris used (as mentioned before). This is because these outputs were generated while testing the Contract Analyzer Agent.
2.3.3 Batch run
Batch Run allows multiple files to be selected at once as input to the agent.
More details about this feature are available in the Batch Processing documentation.
2.4 Share your agent
The Share option in the agents interface allows an agent to be downloaded for sharing purposes.
When this option is clicked, a .zip file will be created and made ready for download. The user can download the file and share the ZIP file by email or any file-sharing method. Another Model HQ user can then upload it by following the upload steps.
When sharing agents, it’s recommended to include a Demo mode so others can easily see how the agent works and what it’s designed to do.

2.5 Uploading an agent
The Upload option in the agents interface allows agents to be uploaded.

If a downloaded agent zip file is available, a custom agent can be created directly by uploading the zip file, and it will be automatically installed in the list of available agents with the option to edit it further.
2.6 Agent visual builder
The Visual option in the agent interface allows a visual view of an agent to be quickly obtained, along with the ability to edit that agent.
A drag-and-drop based interface is provided that allows any new agent to be built or edited quickly.
Further information about this mode is available in the Agent Visual Builder documentation.
Conclusion
This document provided comprehensive guidance on the Agents interface in Model HQ, covering how to run, share, upload, and visualize agents within the platform. Agents represent automated workflows that combine document parsing, retrieval-augmented generation, language model inference, and structured output generation into repeatable, scalable processes. Pre-built agents such as Contract Analyzer, Customer Support, Financial Data Extractor, and Research Process demonstrate common use cases and serve as templates that can be customized to meet specific organizational requirements.
For further assistance or to share feedback, please contact us at support@aibloks.com