Model HQ
Documentation1. Launching the interface
To begin creating a new agent, the following steps should be performed:

Build and Deploy AI Agents in Minutes on AI PCs - No Code Needed

Build Live Demos for AI Agents | Model HQ Agent Demo Mode

Contract Analyzer Agent in Minutes (No-Code + Offline) | Model HQ Demo

Handwriting-Reading Agent with On-Device AI | Prescription Reading Agent (no code, private)

Private, Local Image Agents in Model HQ: Describe Images + Extract Numbers (Fast!)

No-Code Sentiment & Emotion Detection Agent in Model HQ (On-Device + Private AI)
- The Main Menu should be navigated to.
- The Agents section should be selected.
- The Build New option should be clicked to initiate a new agent.
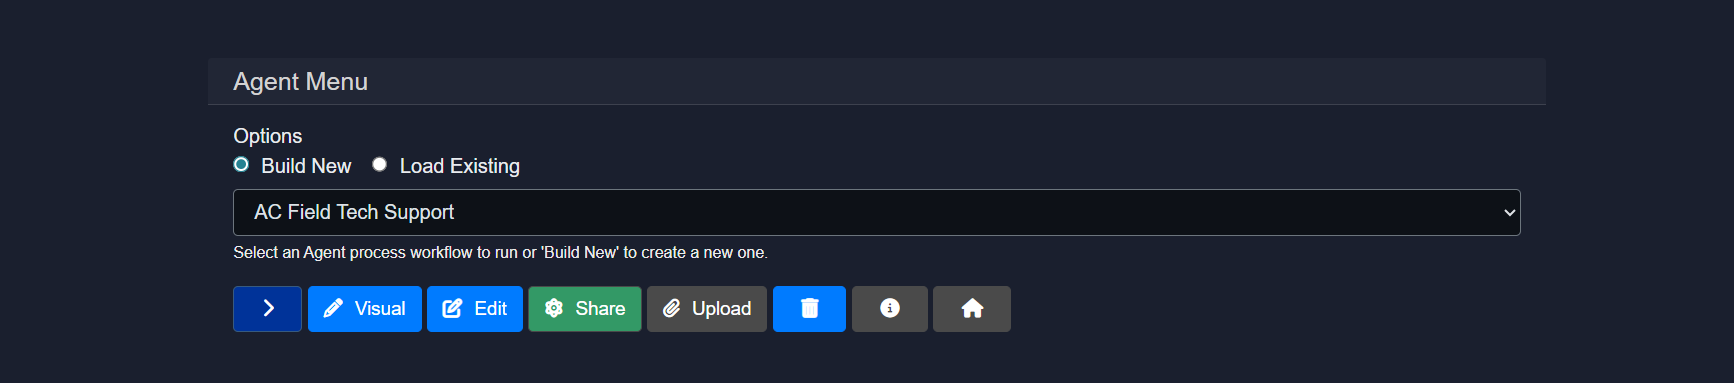
The > button can be selected to proceed to the next step.
2. Agent builder overview
When the agent creation flow is initiated, two primary options are presented:
- Option 1 — A new process can be built from scratch, or an existing agent can be used as the starting point by deriving from it.
- Option 2 — A pre-packaged agent template can be uploaded from a
.zipfile to import a fully configured agent.
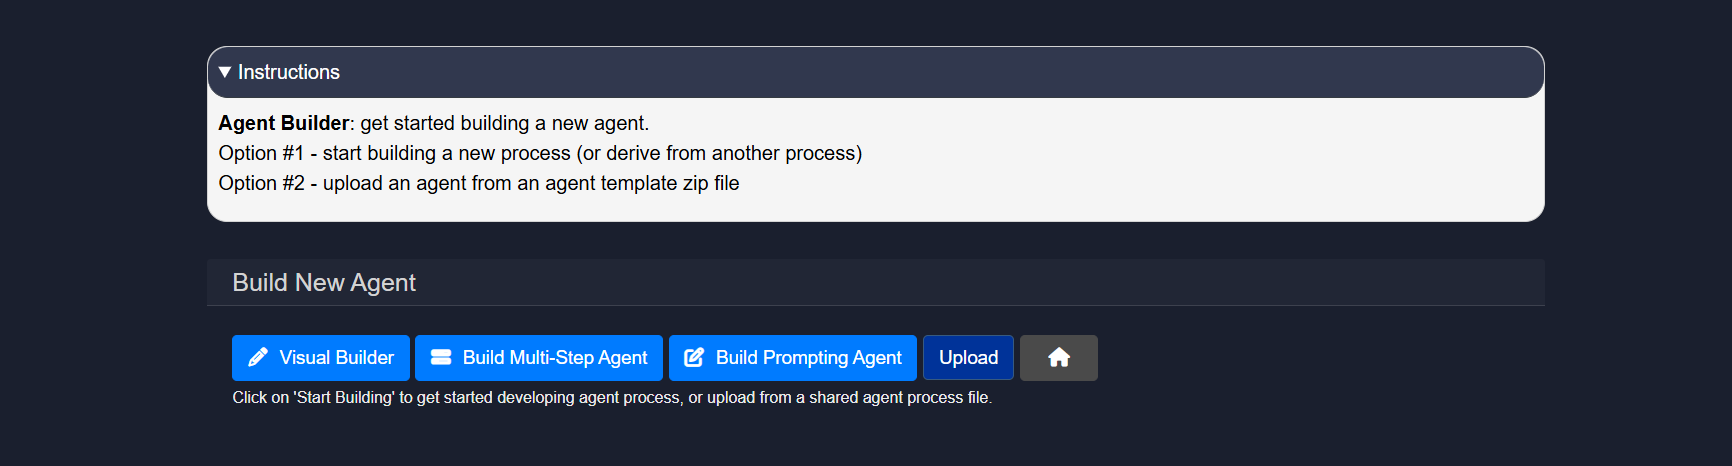
The sections below cover Option 1 in detail, walking through each of the available creation modes. When building an agent from scratch or from an existing workflow, three modes are available:
- Visual Builder
- Build Multi-Step Agent
- Build Prompting Agent
3.1 Visual builder
The Visual Builder provides an interactive drag-and-drop interface for creating agents using a node-and-wire paradigm. This mode is particularly suited for users who prefer visual workflow design over text-based configuration. Nodes representing different services — such as document parsing, RAG retrieval, data extraction, or model inference — can be placed on a canvas and connected to define execution flow and data dependencies. Each node can be individually configured with specific instructions, input contexts, and output mappings through intuitive forms and dropdowns.
The Visual Builder excels at creating complex workflows involving branching logic, conditional execution, and parallel processing paths, as these structures are more readily understood and modified in graphical form. The interface includes support for zooming, panning, rearranging nodes, and validating connections to ensure data flows correctly between steps. Once a visual workflow is complete, it can be executed directly from the builder, exported as a JSON configuration file, or further refined using the step-based editor.
For comprehensive information about the Visual Builder — including detailed walkthroughs of node types, connection rules, configuration options, and best practices for visual workflow design — the Agent Visual Builder Mode documentation should be consulted.
3.2 Build multi-step agent
The Multi-Step Agent builder creates agents as ordered sequences of services that are executed from start to finish. This mode is well-suited for structured, predictable workflows in which each step has a clearly defined role and passes its output to the next.
Agent setup: Getting started
Basic information about the agent should be configured at this stage:
- Agent name: A unique, descriptive name should be provided that clearly indicates the agent's purpose — for example, Contract Analyzer, Invoice Processor, or Research Summarizer.
- Input definition: The input types that will be provided when the agent is run should be selected. By selecting a user input, this will define the first step in the agent process. By default, text is defined as MAIN-INPUT. Additional input types — such as User-Document, User-Table, User-Image, or User-Source — can be enabled as required by the workflow.
Select the type of input that will kick off the agent process and describe the input that is expected in the Description section so that the user will have a clear indication of what type of file or input is intended to work with the agent.
Note: The Visual Builder only accepts one input node and will not work with multiple input nodes. For workflows needing multiple inputs or input types, it is recommended to work with the Multi-Step Agent builder that can be accessed by selecting "Build Multi-Step Agent".
Example 1: For an agent process in which the user is expected to input a document AND an image to run the agent process, use "Build Multi-Step Agent".
Example 2: For an agent process that uses a single input such as a PDF file or an Image for RAG answering or Vision model execution, use "Visual Builder."
Example 3: For agents requiring Batch processing, either type of builder can be used for building the agent itself.
- Derive Agent: The agent can be built from scratch with a blank workflow (the default), or an existing agent can be selected as the base to derive from, inheriting its pre-built logic and structure.
3.3 Build prompting agent
The Prompting Agent builder is designed for creating conversational AI workflows that centre on natural language interactions and prompt-based model invocations. This mode is the simplest entry point for deploying a language model with custom instructions, making it well-suited for question-answering agents, summarisation assistants, and other single-model interaction patterns.
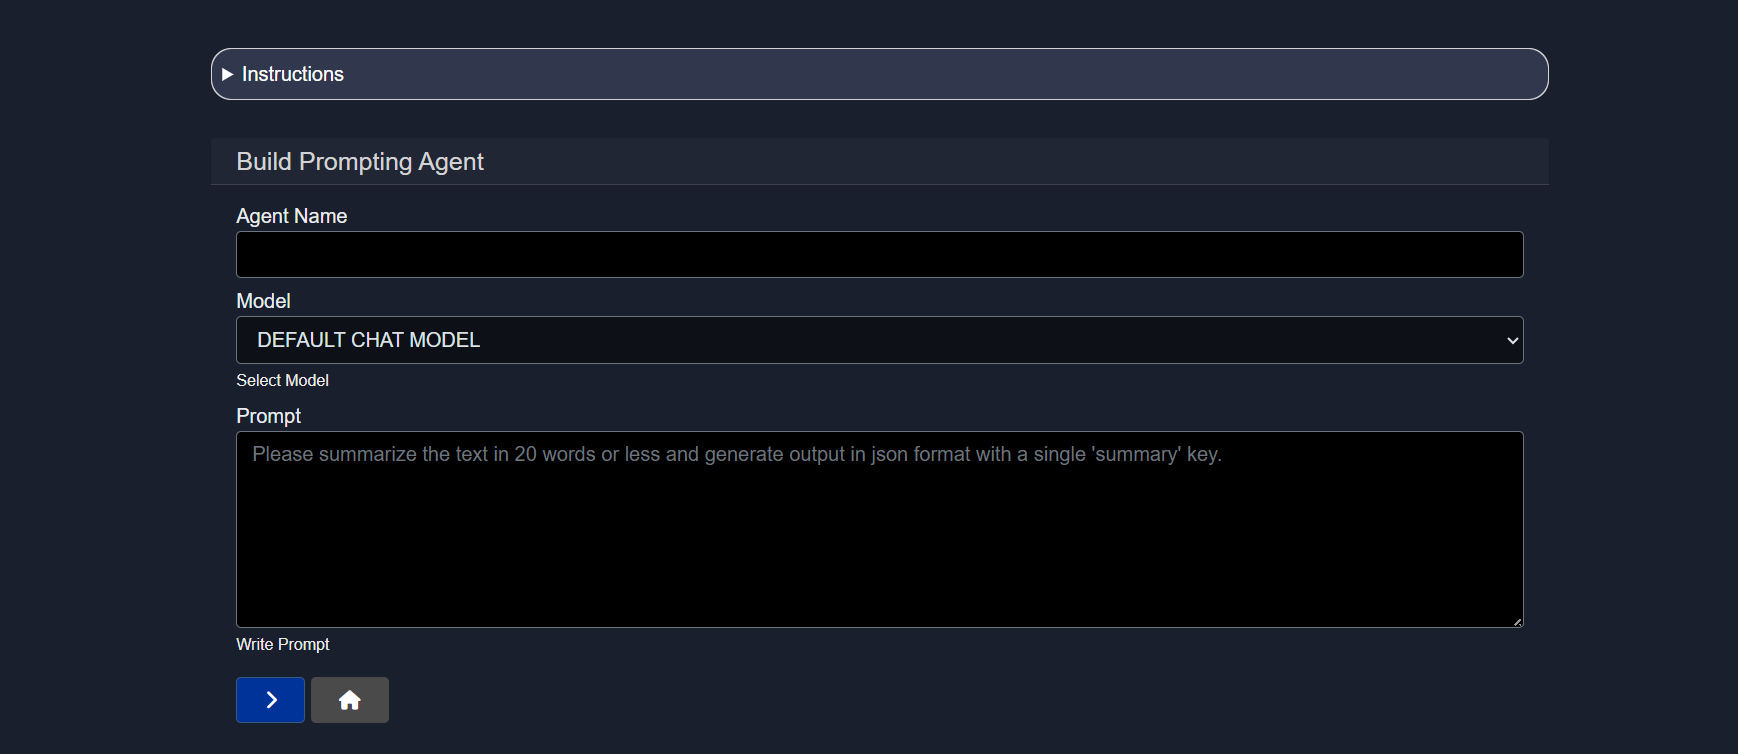
The configuration steps for the Prompting Agent — including name, input definition, and starting point — follow the same structure as described in the Multi-Step Agent setup above. For details on subsequent configuration options such as services, controls, and plan, refer to the Editing Agents documentation.
Conclusion
This document described the agent creation interface in Model HQ and the three primary modes available for building new agents: the Visual Builder, the Multi-Step Agent builder, and the Prompting Agent builder. Each mode provides a different entry point into the agent development process, and the appropriate choice will depend on the complexity of the intended workflow and the preferred working style of the user.
Regardless of the mode selected, the foundational steps remain consistent: a meaningful agent name should be assigned, the correct input types should be defined, and a decision should be made on whether to start from a blank slate or derive from an existing agent. These initial choices shape the structure of the workflow and influence how the agent will be configured and maintained over time.
For next steps, the Agent Visual Builder documentation covers the Visual Builder in detail, and the Editing Agents documentation provides a full reference for all configuration options available after the initial setup — including steps, services, controls, plans, and output settings.
For further assistance or to share feedback, please contact us at support@aibloks.com