Model HQ
DocumentationCreating a New Agent
This guide provides a step-by-step walkthrough for creating a new agent using the platform. You will learn how to initiate a new agent, configure its properties, build its process logic, and finalize its setup.
Agent Menu
To begin creating a new agent:
- Navigate to the Main Menu.
- Go to the Agents section.
- Select the
Build Newoption to initiate a new agent.
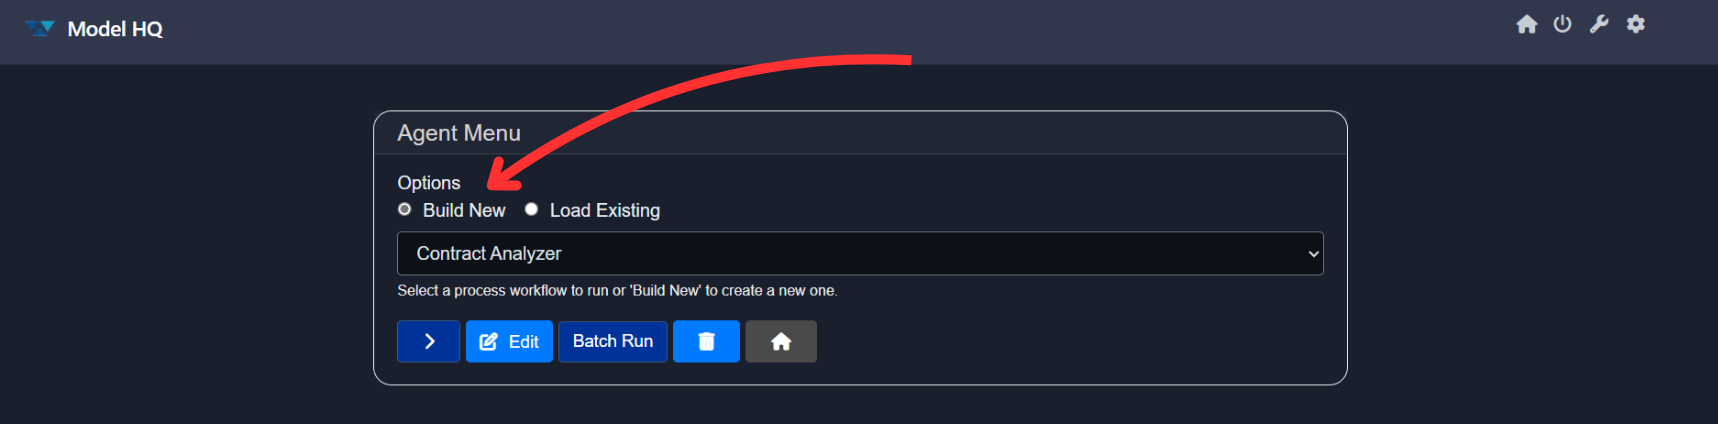
Click on > to proceed to the next step.
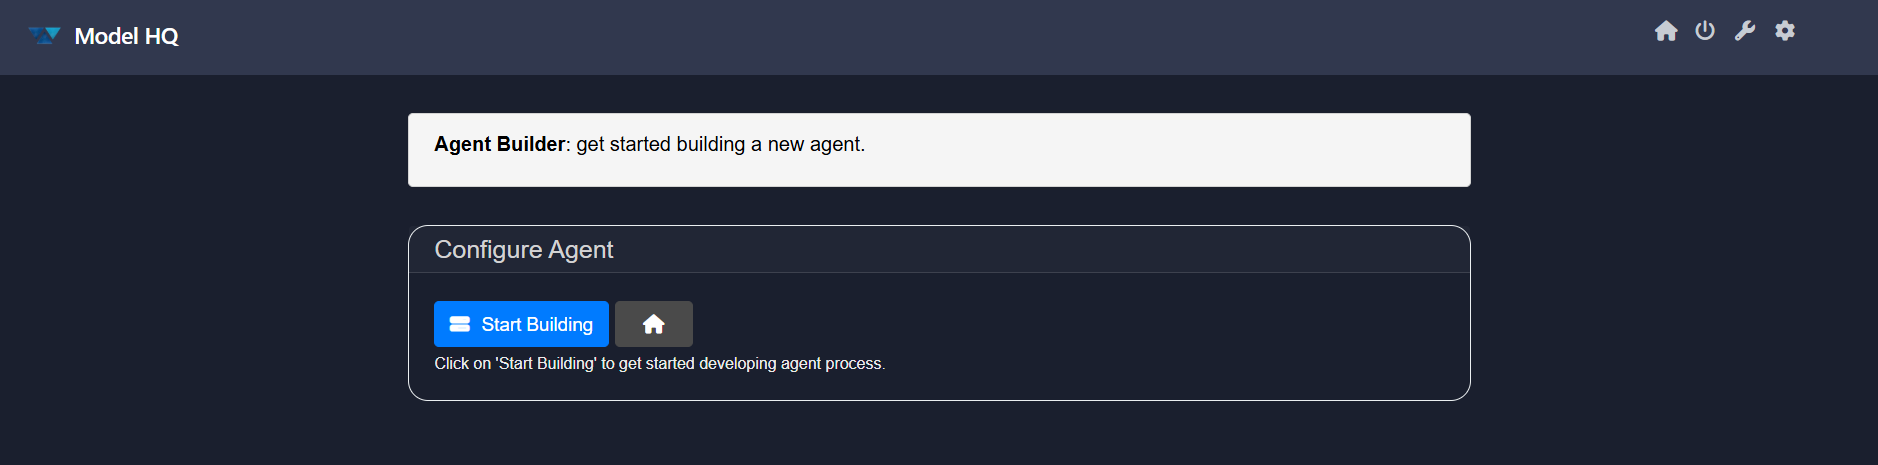
Configure Agent
Click on Start Building to begin the agent development process.
Agent Setup
In this section, you will define the foundational settings for your agent.
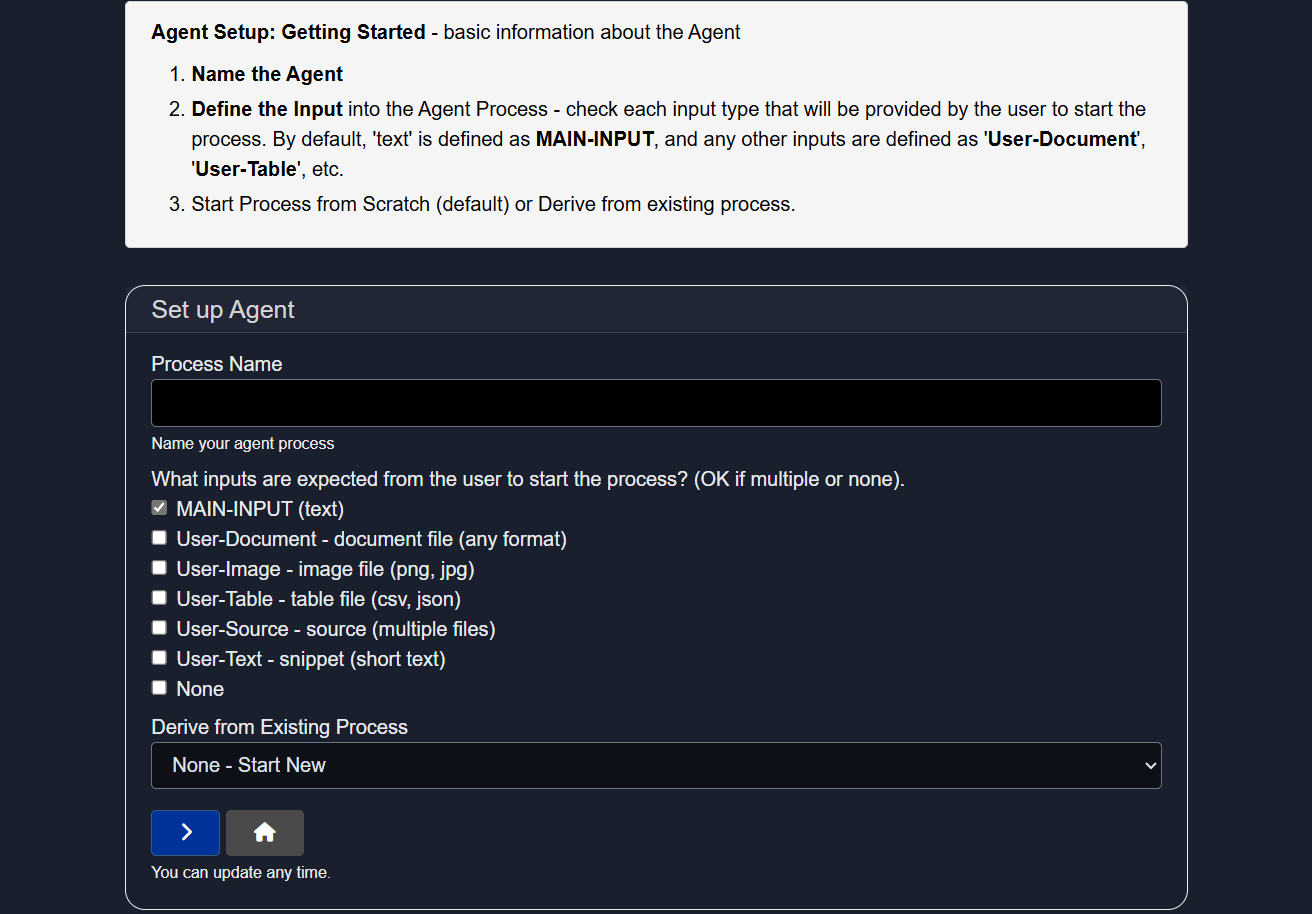
Inputs
- Name the Agent — Provide a unique and descriptive name for your agent.
- Define Inputs — Specify the input types required from users to initiate the agent. This is a critical step as it is VERY IMPORTANT to select the correct inputs that will be used in the Agent process - the inputs may also be modified as you are creating the agent but you will always need to select the necessary inputs. By default,
MAIN-INPUT (text)is set.
MAIN-INPUT (text): refers to a piece of text that will be typed or copied and pasted into the text field - the current limit is 5000 characters for this text field (approximately up to 2 pages of text).User-Document: A larger document which must be PARSED first via the 'parse_document' service in the Agent 'Select Service' prior to being used in an agent workflow. Important: A User Document must almost always be processed first via the 'parse_document' service, which then breaks up the document text into smaller chunks, prior to being used for other Agent Services such as Rag_Answer, Semantic_Filter, Document_Filter or Create_Context.User-Table: A user can upload a .CSV or JSON that the agent will attempt to interpret as a table with labelled columns and a consistent set of rows that it can label. Important: A User Table must first be processed via 'build-table' service prior to being used in an Agent process from the 'Select Service' dropdown. The Build Table service will attempt to extract relevant information and save the information in a local SQL database in Model HQ prior to using any table in an Agent process.
The agent process must:
- Upload a table,
- 'Build_Table' from the Agent 'Select Service' dropdown (this service extracts all the information and attempts to build a database table from the information submitted), and
- 'Query_Custom_Table' (this service expects an input context that is a table inference from the 'Build_Table' service) which allows a user to ask a simple natural language question from the Table.
User-Image: A user can upload an image file such as .PNG or .JPEG for image processing in an agent workflow. Important: A User Image must first be processed via the 'vision' service prior to being used in an Agent Process from the 'Select Service' dropdown menu. The Vision service will take an image file along with a text input of a question or instruction, then returns a text output context with the answer based on the contents of the image.User-Text: Designed to be a secondary piece of additional context that a user can provide in an Agent workflow.User-Source: A User Source allows the user to upload a grouping of indefinite number of documents, images, etc. that can all be packaged as a source to be treated as one object. While most use cases have single or few inputs, this allows for more dynamic, flexible method of allowing for variable user input. If you select User Source, you do not need to go through the Parse_Document, Build_Table, or Vision services as these services will automatically be applied. Important: It is recommended to use 'Text_Filter'> 'Semantic_Filter' > 'Create_Context' first when being used in an agent process to surface the most relevant text chunks. As you get more advanced in Agent building, this order can change.
It is important to select only the user inputs you expect to use in the process. The user will be expected to designate all of the inputs selected to run the process.
- Start Process — Choose to start from scratch or derive from an existing agent workflow.
If you prefer not to create an agent from scratch, you can use the
Derive from Existing Processoption to build upon or modify an existing agent template for your specific use case.
Check out our YouTube video for a tutorial on "how to edit an existing agent process": https://youtu.be/UTNQxspDi3I
For this example, we'll continue using the default settings and name our agent demo.
Agent Builder
This is where you construct the core logic of your agent.
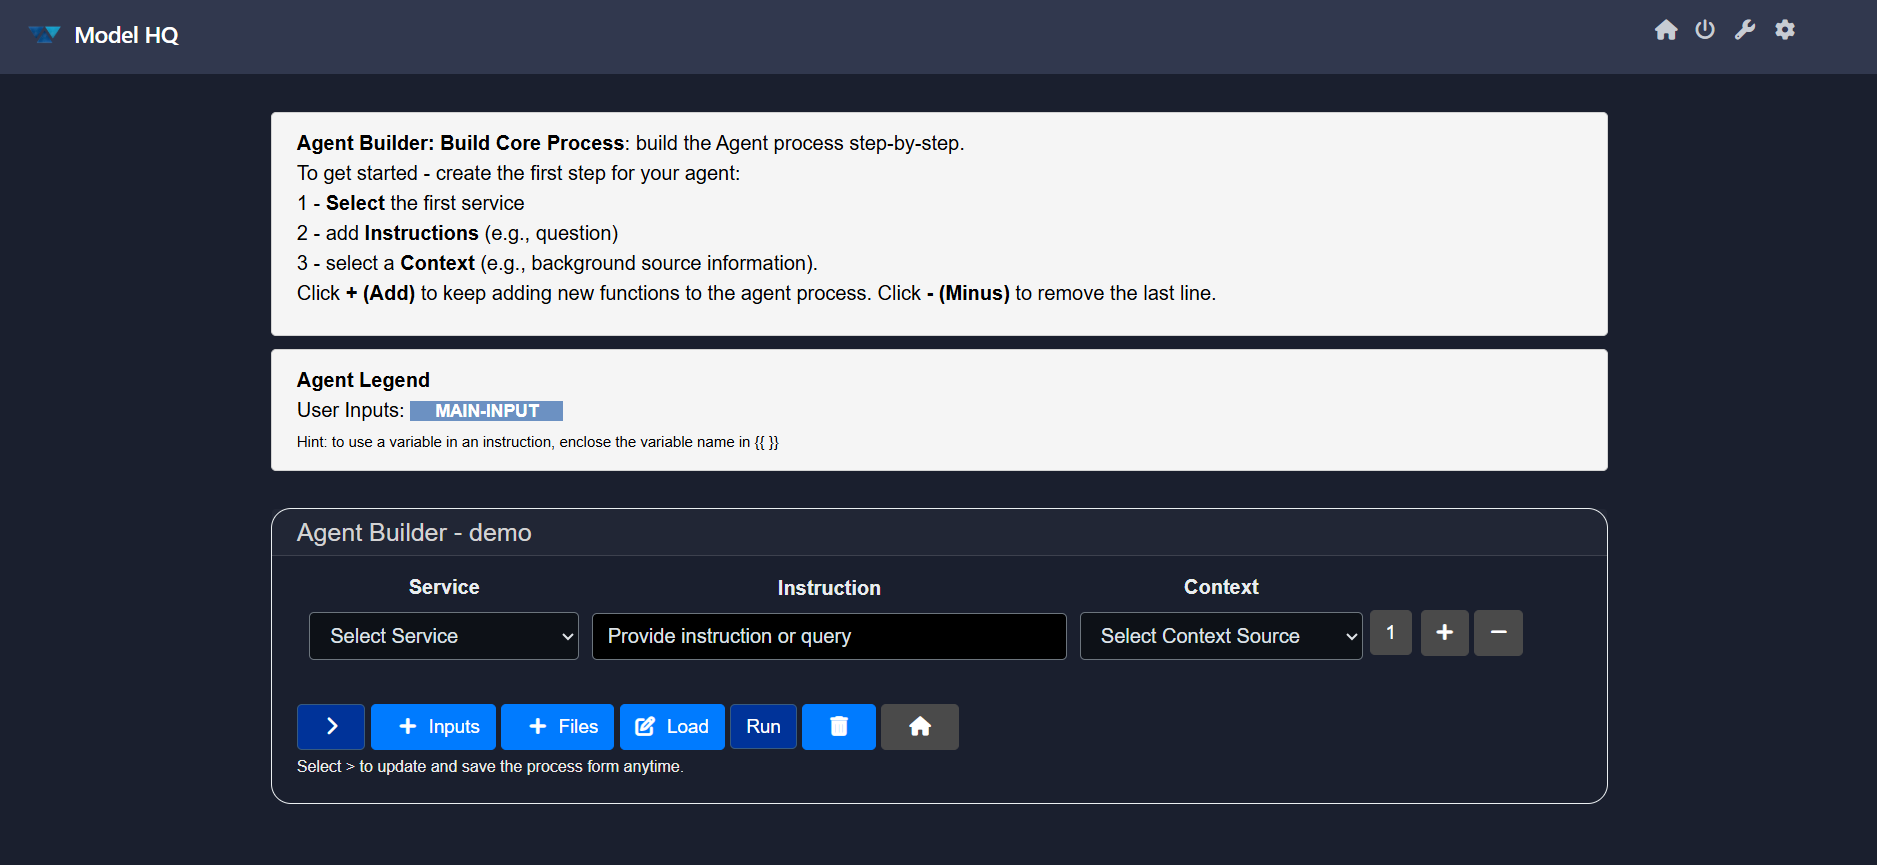
🏗️ Building the Process
To define each step in the agent workflow:
- Select a Service — Choose the service the agent will use in this step.
- Add Instructions — Provide the agent with a prompt or directive (e.g., a question).
- Select Context — Optionally provide source material or background data to assist the agent.
Click + (Add) to append a new step, or - (Minus) to remove the last one.
The Agent Builder also includes the following options:
- Inputs: This section lets you configure or update the user inputs defined earlier during setup. (See detailed instructions about Inputs above)
- Files: This button allows the user to Add files that will be used in the Agent workflow with the option to explicitly indicate whether the file type is a Document, Table, Image or a Source (a mix of different file types, typically larger in size). In addition, the user can also query a pre-built aggregated source to be used in the agent workflow.
- Load: This button allows the user to Load a pre-built Agent workflow to use or to modify the workflow. Please note that the Load button will replace any current process on the screen, and all edits to existing workflows must start with the Loaded Workflow first.
- Run: Takes the user to the confirmation screen asking the user to select
>to proceed to the agent process or to select 'Home' to return to the previous screen. - Reset (🗑️): Resets the entire screen.
- Home: Takes the user to the Main Menu
Find the detailed description of every button in the Agent Builder Options section.
🛠 Services, Instructions, Description & Expected Context
Below is the list of supported services, their expected instruction formats, descriptions, and applicable context sources.
| Service Name | Instruction | Description | Context |
|---|---|---|---|
| build_table | Enter name of table (will be built from the selected input table file) | Create Table from CSV data | User-Table |
| query_custom_table | Enter query for database table | Database lookup in natural language. Requires build_table first. Keep table schema in mind. | Enter_name_of_Table This table is the result of Build_Table service step. |
| semantic_filter | What is your question or instruction? | Filters an existing source based on question/topic to create new filtered source | User-Source |
| text_filter | What is the keyword or topic to filter the source? | Filters an existing source based on question/topic | User-Source, or a 'filtered' query in the agent process. |
| document_filter | Document name | Filters an existing source by document name | User-Source, or a 'filtered' query in the agent process. |
| table_filter | No instruction required | Filters table type content in User Source | User-Source |
| aggregate_context | List the names of source contexts to consolidate. Use space-separated names like: source_1 source_2 source_3. Do not use curly braces. | Consolidates multiple source contexts into one. This is used to merge several sources into a unified context. | No input context required |
| create_context | What is your question or instruction? | Answers a question or performs an instruction | User-Source |
| parse_document | Enter name of new document source | Creates a source from document for further document-related processing | User-Document |
| ocr | Enter name of new document source | This is the fall-back step to documents that cannot be parsed using the 'parse_document' step because they are image-based PDFs or security-encrypted PDFs. Create Source from Document - a necessary step for handling Document-related workflows such as RAG or Summary. This service must be applied first, prior to using most User-Document related Services. | User-Document |
| rag_answer | Ask question to longer document input | Answers a question based on a longer document input | User-Source, Provide_instruction_or_query |
| report_commentary | (Optional) Guidance to Commentary | Generate report and commentary on key process results from the agent state in Word - no input context required | - |
| agent_report | Enter title for agent report | Prepares report on agent output | - |
| wikipedia_search | Add Wikipedia Articles as Research Context | Adds Wikipedia articles as research context | None |
| embedded_bot | Optional. None required. | Pauses the execution of the agent process to allow the user to interact with the current state of the agent in chat format. | None |
| condition | Enter expression to evaluate in 'if_true' or 'if_false' format | Evaluates the truth value of a condition, which can then be used as a variable in any other process step such that the step will only execute if it meets the selected condition | None |
| web_search | Add query for a topic or a question | Runs web searches returning a summary text as a source and an indexed set of text chunks - needs SERP API or Tavily API | None |
| speech_gen | Enter a topic or short input to convert to speech file | Using a short text input, generates an audio voice wav file based on the input text. (Experimental) | None |
| image_gen | Enter a topic or description to convert to an image | Creates an image using the description or instruction provided by the user | None |
| website_scraper | Enter the full website URL | Scrapes the website in question to extract content for a downstream question in the agent process (may not work for all websites due to scraping protection) | None |
| send_email | Enter the email address of the receiver | Automatically sends an email using Gmail (requires credentials provided in Configuration/Credentials) | Select context of the email |
| connect_library | Enter library name | Connects to Semantic Library from Model HQ API | - |
| query_library | Enter query for semantic library | Queries connected semantic library | Enter_Library-name |
| get_stock_summary | Enter stock ticker | Stock lookup using YFinance | None |
| vision | Enter question to image file | Provides answer/description from image | User-Image |
| vision_batch | Enter question to batch of image files | Takes a collection of user images as an input context, along with a text input of a question or instruction. Returns text output context with the answer based on the set of images. | User-Document |
| parse_batch | Enter question to batch of documents files that have been parsed | Takes a collection of document files as an input context, and will return a set of text chunks, indexed and packaged as a source, which can then be used as input to a number of other services | User-Document |
| sentiment | No instruction required | Analyzes sentiment (positive/negative/neutral) | MAIN-INPUT, User-Text |
| boolean | Provide yes/no question | Provides yes/no answer with explanation | MAIN-INPUT, User-Text |
| emotions | No instruction required | Analyzes primary emotion in input | MAIN-INPUT, User-Text |
| topics | No instruction required | Classifies topic of input | MAIN-INPUT, User-Text |
| tags | No instruction required | Generates tags from input | MAIN-INPUT, User-Text |
| intent | No instruction required | Classifies intent of input | MAIN-INPUT, User-Text |
| ratings | No instruction required | Rates positivity from 1 to 5 | MAIN-INPUT, User-Text |
| ner | No instruction required | Identifies named entities (people, places, organizations) | MAIN-INPUT, User-Text |
| xsum | No instruction required | Generates extreme summary or headline | MAIN-INPUT, User-Text |
| summary | Optional - add input instructions to focus the summarization | Summarizes source content | MAIN-INPUT, User-Text |
| category | No instruction required | Analyzes category of the input passage | MAIN-INPUT, User-Text |
| q_gen | No instruction required | Generates question from passage | MAIN-INPUT, User-Text |
| chat | What is your question or instruction? | Answers a question or performs instruction | MAIN-INPUT, User-Text, None |
| extract | Enter extraction key, e.g., 'customer name' | Extracts key-value pair | MAIN-INPUT, User-Text |
| extract_tiny | Enter extraction key, e.g., 'customer name' | Extracts key-value pair (tiny version) | MAIN-INPUT, User-Text |
| answer | What is your question? | Answers specific question from passage | MAIN-INPUT, User-Text |
| extract_table | Enter query to filter among available tables | Extracts table from document | User-Document |
| END | End of process | Marks the end of agent process | None |
| openai_chat | Enter input question or instruction | Chat agent calls OpenAI (requires separate API key in Configuration/Credentials) with an optional text input context. The output provides a context passage that can be used by other services | Main Input or other Text Source |
| openai_rag | Enter input question or instruction | Calls OpenAI (requires separate API key in Configuration/Credentials) with a RAG question. The output provides a context passage that can be used by other services | Main Input or other Text Source |
| openai_rag_batch | Enter input question or instruction | Calls OpenAI (requires separate API key in Configuration/Credentials) with a batch of document sources and generates a response based on the input instruction/question. The output provides a context passage that can be used by other services | Main Input or other Text Source |
| anthropic_chat | Enter input question or instruction | Chat agent calls Anthropic (requires separate API key in Configuration/Credentials) with an optional text input context. The output provides a context passage that can be used by other services | Main Input or other Text Source |
Service Name
build_table
Instruction
Enter name of table (will be built from the selected input table file)
Description
Create Table from CSV data
Context
User-Table
Service Name
query_custom_table
Instruction
Enter query for database table
Description
Database lookup in natural language. Requires build_table first. Keep table schema in mind.
Context
Enter_name_of_Table This table is the result of Build_Table service step.
Service Name
semantic_filter
Instruction
What is your question or instruction?
Description
Filters an existing source based on question/topic to create new filtered source
Context
User-Source
Service Name
text_filter
Instruction
What is the keyword or topic to filter the source?
Description
Filters an existing source based on question/topic
Context
User-Source, or a 'filtered' query in the agent process.
Service Name
document_filter
Instruction
Document name
Description
Filters an existing source by document name
Context
User-Source, or a 'filtered' query in the agent process.
Service Name
table_filter
Instruction
No instruction required
Description
Filters table type content in User Source
Context
User-Source
Service Name
aggregate_context
Instruction
List the names of source contexts to consolidate. Use space-separated names like: source_1 source_2 source_3. Do not use curly braces.
Description
Consolidates multiple source contexts into one. This is used to merge several sources into a unified context.
Context
No input context required
Service Name
create_context
Instruction
What is your question or instruction?
Description
Answers a question or performs an instruction
Context
User-Source
Service Name
parse_document
Instruction
Enter name of new document source
Description
Creates a source from document for further document-related processing
Context
User-Document
Service Name
ocr
Instruction
Enter name of new document source
Description
This is the fall-back step to documents that cannot be parsed using the 'parse_document' step because they are image-based PDFs or security-encrypted PDFs. Create Source from Document - a necessary step for handling Document-related workflows such as RAG or Summary. This service must be applied first, prior to using most User-Document related Services.
Context
User-Document
Service Name
rag_answer
Instruction
Ask question to longer document input
Description
Answers a question based on a longer document input
Context
User-Source, Provide_instruction_or_query
Service Name
report_commentary
Instruction
(Optional) Guidance to Commentary
Description
Generate report and commentary on key process results from the agent state in Word - no input context required
Context
-
Service Name
agent_report
Instruction
Enter title for agent report
Description
Prepares report on agent output
Context
-
Service Name
wikipedia_search
Instruction
Add Wikipedia Articles as Research Context
Description
Adds Wikipedia articles as research context
Context
None
Service Name
embedded_bot
Instruction
Optional. None required.
Description
Pauses the execution of the agent process to allow the user to interact with the current state of the agent in chat format.
Context
None
Service Name
condition
Instruction
Enter expression to evaluate in 'if_true' or 'if_false' format
Description
Evaluates the truth value of a condition, which can then be used as a variable in any other process step such that the step will only execute if it meets the selected condition
Context
None
Service Name
web_search
Instruction
Add query for a topic or a question
Description
Runs web searches returning a summary text as a source and an indexed set of text chunks - needs SERP API or Tavily API
Context
None
Service Name
speech_gen
Instruction
Enter a topic or short input to convert to speech file
Description
Using a short text input, generates an audio voice wav file based on the input text. (Experimental)
Context
None
Service Name
image_gen
Instruction
Enter a topic or description to convert to an image
Description
Creates an image using the description or instruction provided by the user
Context
None
Service Name
website_scraper
Instruction
Enter the full website URL
Description
Scrapes the website in question to extract content for a downstream question in the agent process (may not work for all websites due to scraping protection)
Context
None
Service Name
send_email
Instruction
Enter the email address of the receiver
Description
Automatically sends an email using Gmail (requires credentials provided in Configuration/Credentials)
Context
Select context of the email
Service Name
connect_library
Instruction
Enter library name
Description
Connects to Semantic Library from Model HQ API
Context
-
Service Name
query_library
Instruction
Enter query for semantic library
Description
Queries connected semantic library
Context
Enter_Library-name
Service Name
get_stock_summary
Instruction
Enter stock ticker
Description
Stock lookup using YFinance
Context
None
Service Name
vision
Instruction
Enter question to image file
Description
Provides answer/description from image
Context
User-Image
Service Name
vision_batch
Instruction
Enter question to batch of image files
Description
Takes a collection of user images as an input context, along with a text input of a question or instruction. Returns text output context with the answer based on the set of images.
Context
User-Document
Service Name
parse_batch
Instruction
Enter question to batch of documents files that have been parsed
Description
Takes a collection of document files as an input context, and will return a set of text chunks, indexed and packaged as a source, which can then be used as input to a number of other services
Context
User-Document
Service Name
sentiment
Instruction
No instruction required
Description
Analyzes sentiment (positive/negative/neutral)
Context
MAIN-INPUT, User-Text
Service Name
boolean
Instruction
Provide yes/no question
Description
Provides yes/no answer with explanation
Context
MAIN-INPUT, User-Text
Service Name
emotions
Instruction
No instruction required
Description
Analyzes primary emotion in input
Context
MAIN-INPUT, User-Text
Service Name
topics
Instruction
No instruction required
Description
Classifies topic of input
Context
MAIN-INPUT, User-Text
Service Name
tags
Instruction
No instruction required
Description
Generates tags from input
Context
MAIN-INPUT, User-Text
Service Name
intent
Instruction
No instruction required
Description
Classifies intent of input
Context
MAIN-INPUT, User-Text
Service Name
ratings
Instruction
No instruction required
Description
Rates positivity from 1 to 5
Context
MAIN-INPUT, User-Text
Service Name
ner
Instruction
No instruction required
Description
Identifies named entities (people, places, organizations)
Context
MAIN-INPUT, User-Text
Service Name
xsum
Instruction
No instruction required
Description
Generates extreme summary or headline
Context
MAIN-INPUT, User-Text
Service Name
summary
Instruction
Optional - add input instructions to focus the summarization
Description
Summarizes source content
Context
MAIN-INPUT, User-Text
Service Name
category
Instruction
No instruction required
Description
Analyzes category of the input passage
Context
MAIN-INPUT, User-Text
Service Name
q_gen
Instruction
No instruction required
Description
Generates question from passage
Context
MAIN-INPUT, User-Text
Service Name
chat
Instruction
What is your question or instruction?
Description
Answers a question or performs instruction
Context
MAIN-INPUT, User-Text, None
Service Name
extract
Instruction
Enter extraction key, e.g., 'customer name'
Description
Extracts key-value pair
Context
MAIN-INPUT, User-Text
Service Name
extract_tiny
Instruction
Enter extraction key, e.g., 'customer name'
Description
Extracts key-value pair (tiny version)
Context
MAIN-INPUT, User-Text
Service Name
answer
Instruction
What is your question?
Description
Answers specific question from passage
Context
MAIN-INPUT, User-Text
Service Name
extract_table
Instruction
Enter query to filter among available tables
Description
Extracts table from document
Context
User-Document
Service Name
END
Instruction
End of process
Description
Marks the end of agent process
Context
None
Service Name
openai_chat
Instruction
Enter input question or instruction
Description
Chat agent calls OpenAI (requires separate API key in Configuration/Credentials) with an optional text input context. The output provides a context passage that can be used by other services
Context
Main Input or other Text Source
Service Name
openai_rag
Instruction
Enter input question or instruction
Description
Calls OpenAI (requires separate API key in Configuration/Credentials) with a RAG question. The output provides a context passage that can be used by other services
Context
Main Input or other Text Source
Service Name
openai_rag_batch
Instruction
Enter input question or instruction
Description
Calls OpenAI (requires separate API key in Configuration/Credentials) with a batch of document sources and generates a response based on the input instruction/question. The output provides a context passage that can be used by other services
Context
Main Input or other Text Source
Service Name
anthropic_chat
Instruction
Enter input question or instruction
Description
Chat agent calls Anthropic (requires separate API key in Configuration/Credentials) with an optional text input context. The output provides a context passage that can be used by other services
Context
Main Input or other Text Source
Building and Querying a Custom Table
When you build a custom table, a database is created and stored in memory using the
table namespecified in the Instruction field.
If you later update or replace the table with new data, you must also change the table name in the Instruction field. This signals to the system that a new database should be created.
Otherwise, it will continue referencing the previous version of the table.
How to create an Agent from Agent Builder
This guide outlines how to use the Agent Builder to create custom multi-step AI agents. The interface provides a visual and structured way to define services, instructions, and contexts for each step in your agent's workflow.

Creating a "Demo Agent"
After understanding the Agent Builder section, let's try to make a demo agent. Before start creating, here is a preview of what our demo agent going to look like.
As we build our agent, the agent builder page will update in real-time after adding every new service to our agent.
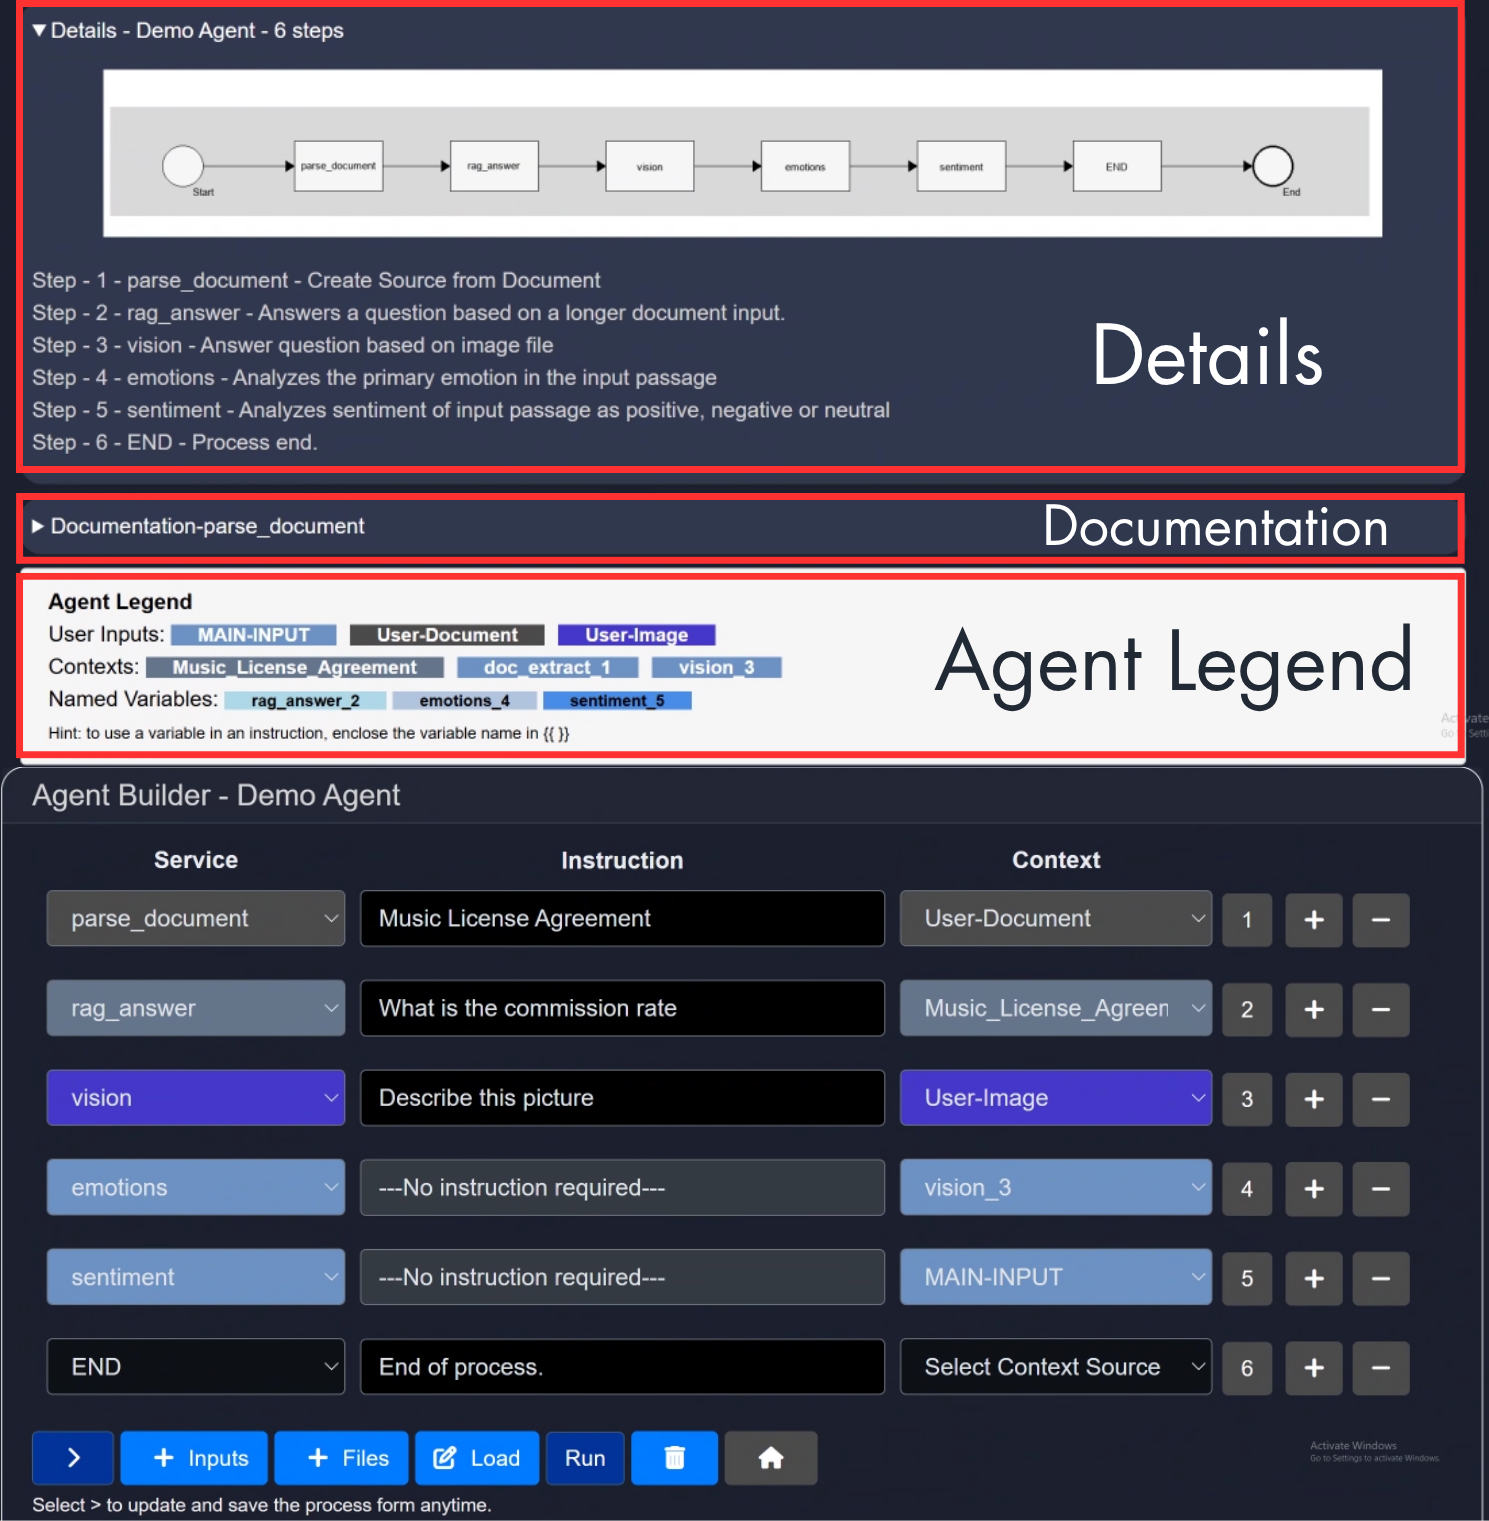
Before starting, let's discuss what these sections mean:
1. Details – <agent_name> – <n> steps
- Flowchart view of the full agent execution sequence.
- Each service block is labeled (e.g.
build_table → query_custom_table → semantic_filter) and ends withSelect Service. - Below the flowchart, each step is listed with:
- Step number
- Service name
- Brief service summary
2. Documentation – documentation-<service_name>
- Displays structured JSON documentation for the selected service.
- This includes:
ServiceNodeDescriptionExampleInput Context options, etc,.
You must select least one service.
3. Agent Legend
This section summarizes the configuration and available tools for the current agent.
- User Inputs:
MAIN-INPUT: Text input from userUser-Document: Document upload (any format)User-Image: Image file (png, jpg)User-Table: Table file (csv, json)User-Source: Source (multiple files)User-Text: Snippet (short plain text)
- Contexts:
- Dynamically generated and labeled based on service usage.
- For example:
Provide_instruction_or_query,filter_3
- Named Variables:
- You can reference any output from a service by using variable syntax.
To use a variable in an instruction, enclose it in double curly braces like so:
{{query_custom_table_2}}
Building a Demo_Agent
Finally, it's time to create a demo agent, and we'll name it Demo_Agent. Since this is just an example, you may name your agent anything you prefer. In the previous section, we used the name 'demo'—you can continue with that if you'd like.
Step 1: Add More INPUT
Click the + Inputs button and select the inputs as shown in the image below:
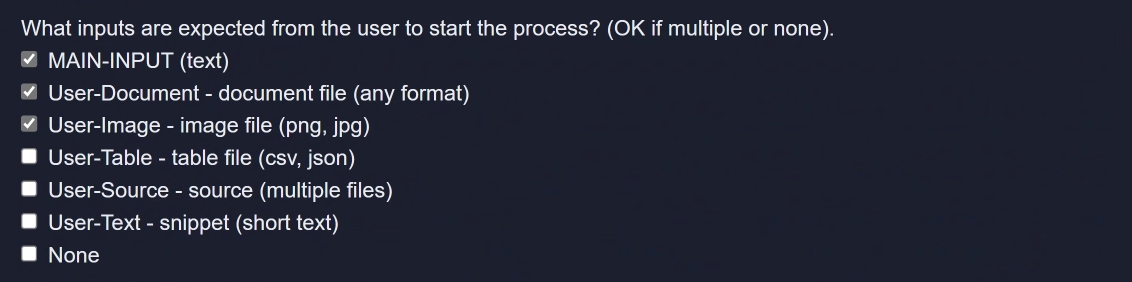
Adding these inputs will allow the user to enter or upload text as MAIN-INPUT, upload a document as User-Document, and upload an image as User-Image.
Click on > to proceed—you will be returned to the Agent Builder page.
Step 2: Add Service
This is the main step in agent creation. When you run the agent, it will execute the services in the order they are added.
Keep in mind that this is a sample agent setup to illustrate how to build an agent. We will select various services and generate successful outputs.
Let's add the services one by one:
- Adding parse_document
For this service, the context isUser_Document(refer to the service table and Define Inputs section above for the proper context to add to this service). We've entered "Music License Agreement" as the instruction to define this agreement.
Now, click the "➕" icon to add a new service. The "➖" icon removes a service. - Adding rag_answer
This service uses the contextUser-SourceorProvide_instruction_or_query. You can query the document with meaningful instructions related to the document. Here, we use the previously defined "Music License Agreement" as the context and ask, "What is the commission rate?" as the instruction.
Click the "➕" icon to add another service. - Adding vision
This service usesUser_Imageas context (refer to Define Inputs and the Service Table for more information). We've entered "Describe this picture" as the instruction so that we can build general textual context but you can also ask a more specific question.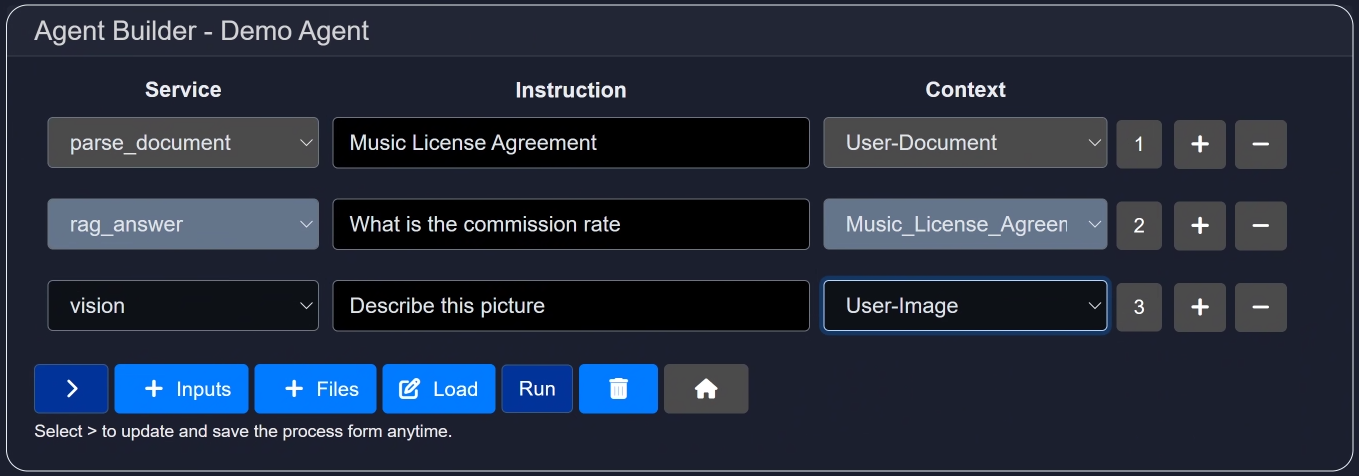
Click the "➕" icon to continue. - Adding emotions
This service usesMAIN-INPUTorUser-Textas context. We selectedUser_Textand usedvision_3(in your case, it might bevision_1) as context since we are trying to assess the emotions in the picture.
Note: This service does not require any instruction.
Click the "➕" icon to proceed. - Adding sentiment
This service also acceptsMAIN-INPUTorUser-Textas context. We usedMAIN-INPUTas the context.
Note: This service also does not require any instruction.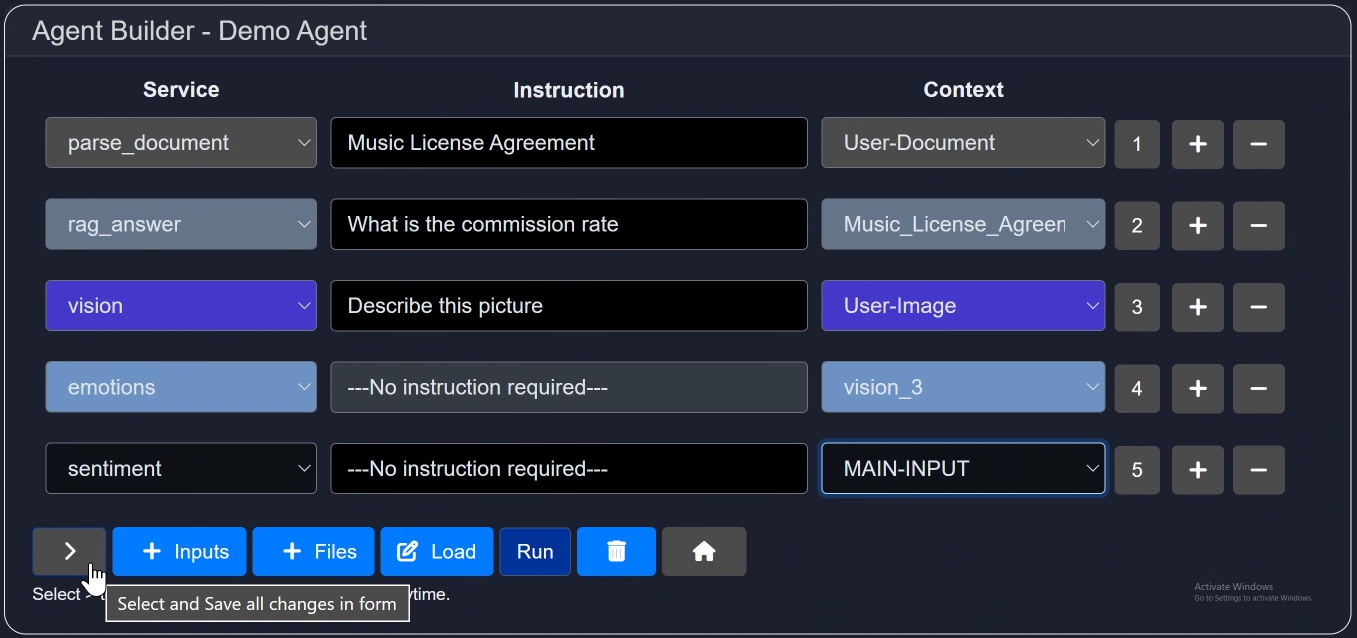
Click the "➕" icon to continue. - Ending the Service
Once you've added a sufficient number of services, conclude the process. You may add as many services as you'd like—feel free to experiment.
For the final step, simply selectENDas the service. No additional input is needed. The context will automatically be set toNONE.
The final agent will look like this:
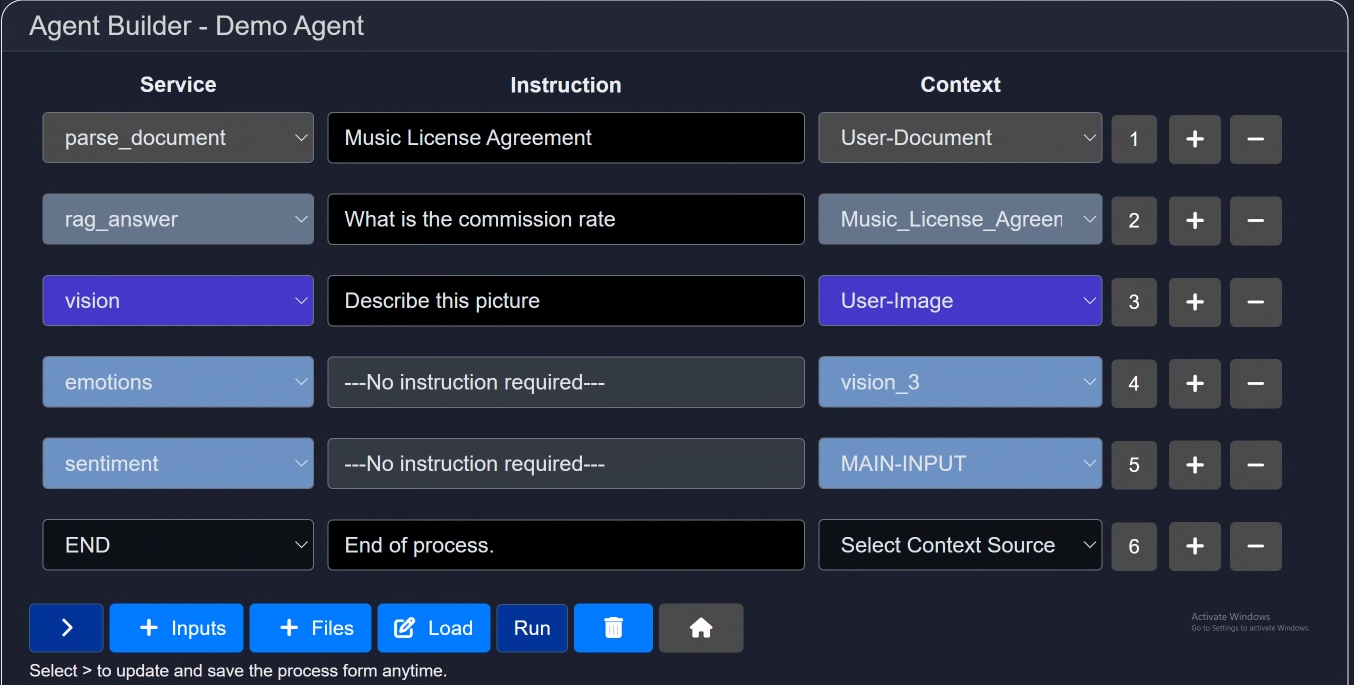
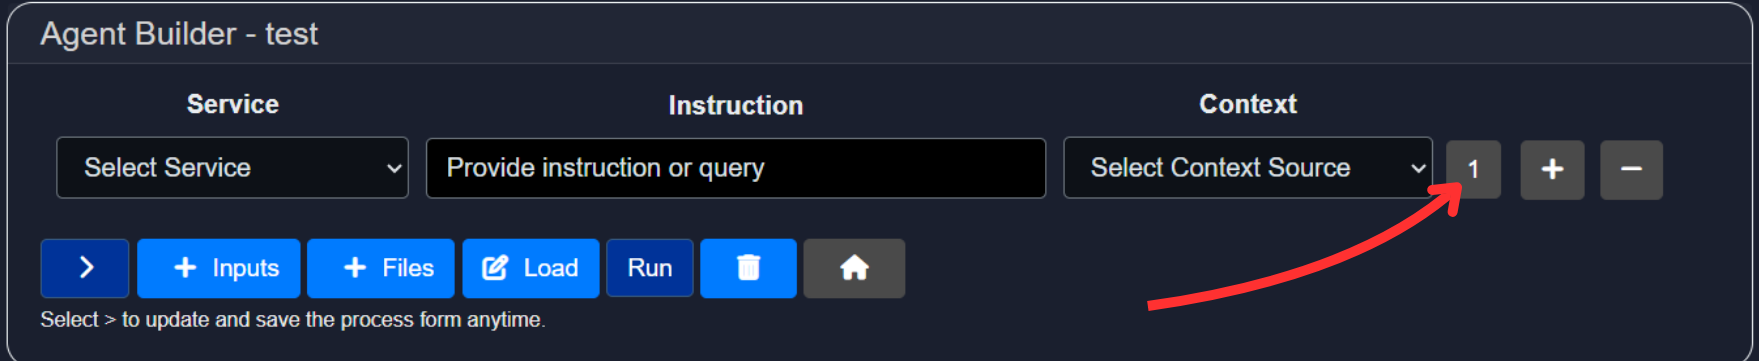
Getting Service Information
Each numbered button (e.g., 1) beside a service step lets you view more information about that service. Clicking the number reveals details like what the service does, expected input formats, and usage tips.
Below is an example for the build_table service after clicking on it:

Step 3: Confirming the Agent
Now that the agent is built, it's time to test it. Click the run icon. You'll see a summary of your configured agent.
This page also asks you to confirm the agent. If anything is missing, go back and make the necessary edits.
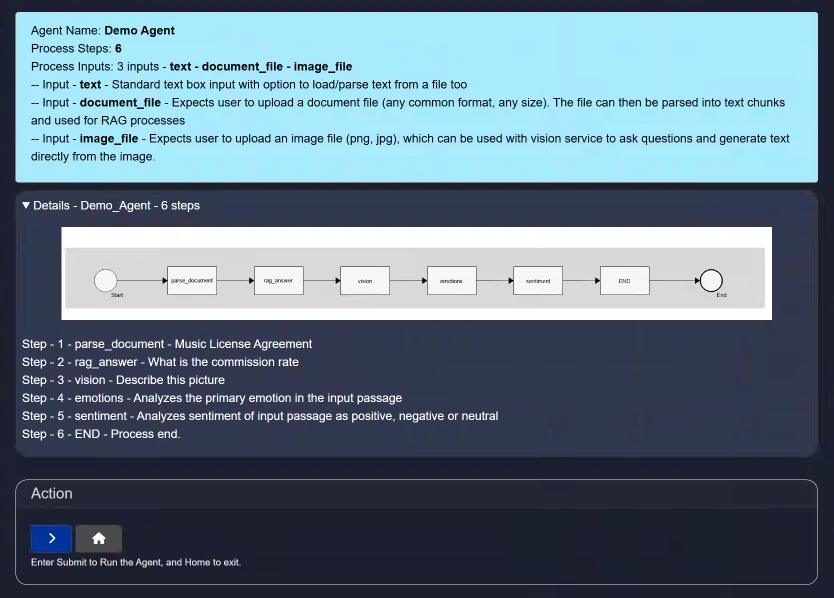
Once satisfied, click on > to proceed.
Step 4: Uploading Inputs
Upload the necessary files as either text, document, or image input.
You must upload all the inputs required by your agent.
In our case, we need 3 inputs: one text (for the sentiment service), one document (for the parse_document service), and one image (for the vision service).
Here's what we've added as input:
- Text: The musician creates joyful, vibrant music for young adults, perfect for celebrations and holidays.
- Document: Upload any document related to music per the instruction "Music License Agreement".
- Image: We uploaded the following image:

Step 5: Running the Agent and Getting an Output
Once you've uploaded all the required inputs, click on > to start the agent.
The agent will begin processing, and depending on your file sizes and internet connection, it will return an output within a minute.
The final output looks like this:
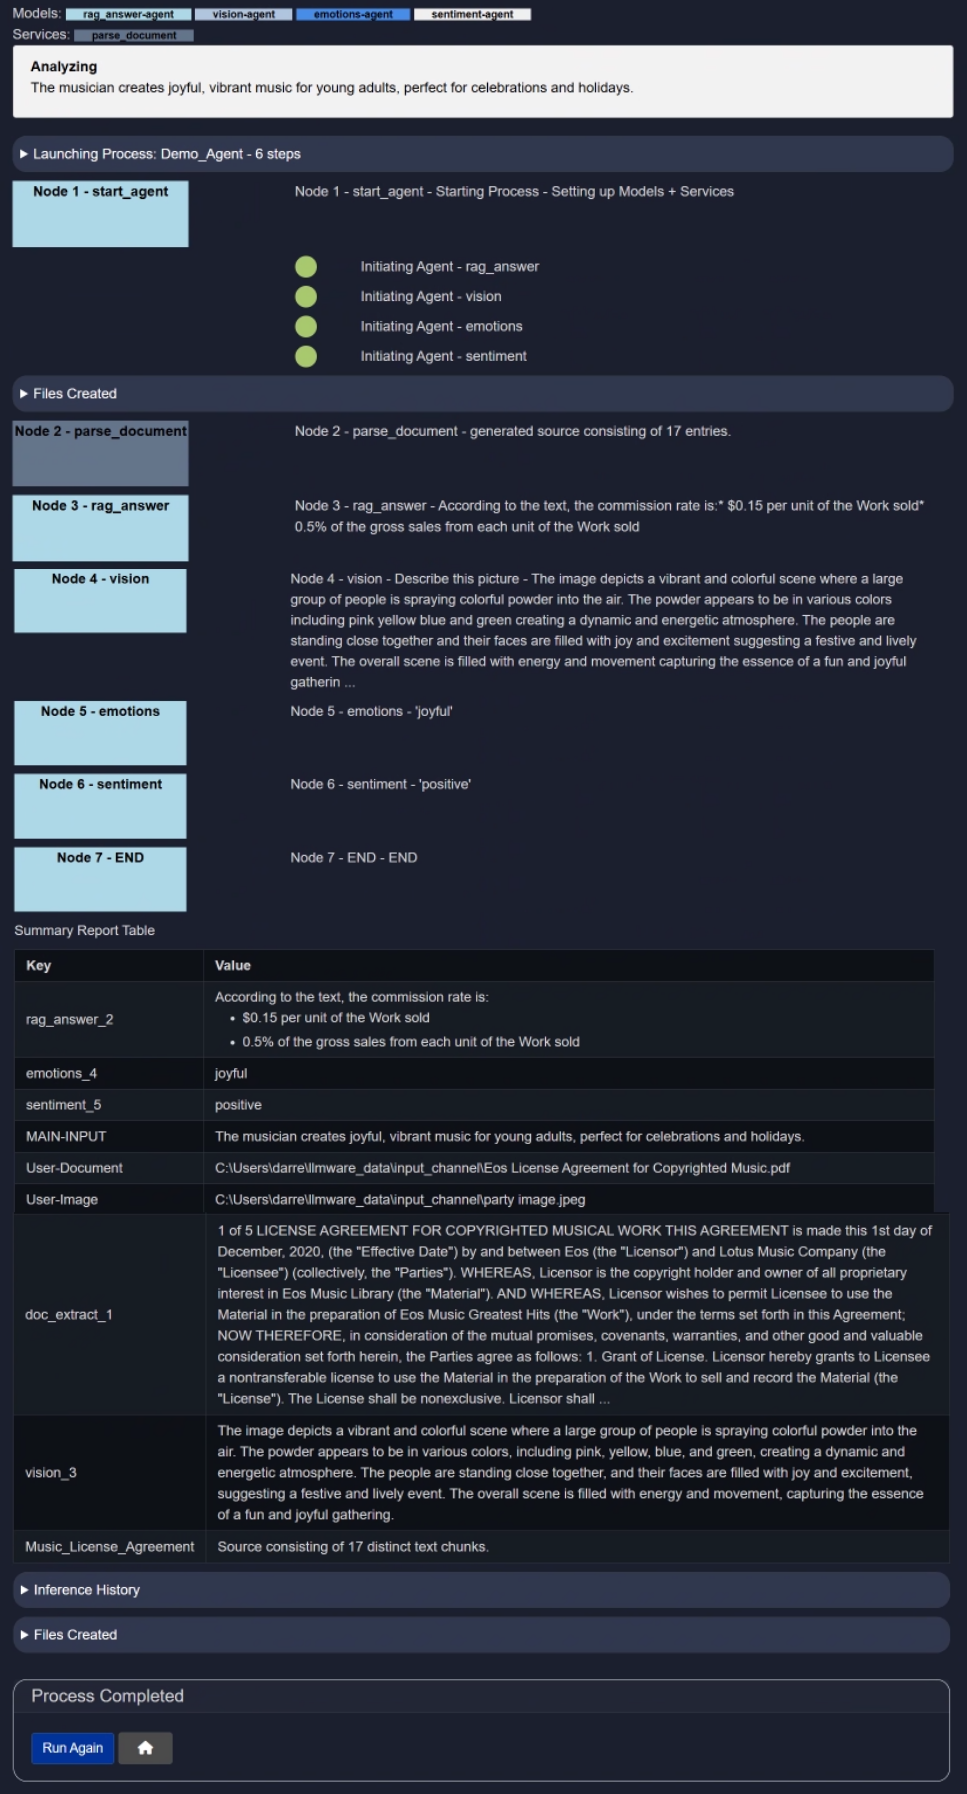
Click Inference History and Files Created to learn more.
Conclusion
You have now successfully created a new agent. To learn how to modify or enhance your agent, please refer to the Edit Agent Documentation.
If you require further assistance or wish to provide feedback, feel free to contact us at support@aibloks.com.